Creating and grading assignments
This guide walks an instructor through the workflow for generating an assignment and preparing it for release to students.
New in version 0.5.0: Much of the core functionality of nbgrader can now be accessed through the “formgrader” extension.
Accessing the formgrader extension
See also
- Installation
Instructions on how to install the formgrader extension.
The formgrader extension provides the core access to nbgrader’s
instructor tools. After the extension has been installed, you can access
it through the command palette (using Command/Ctrl + Shift + c),
then typing formgrader :
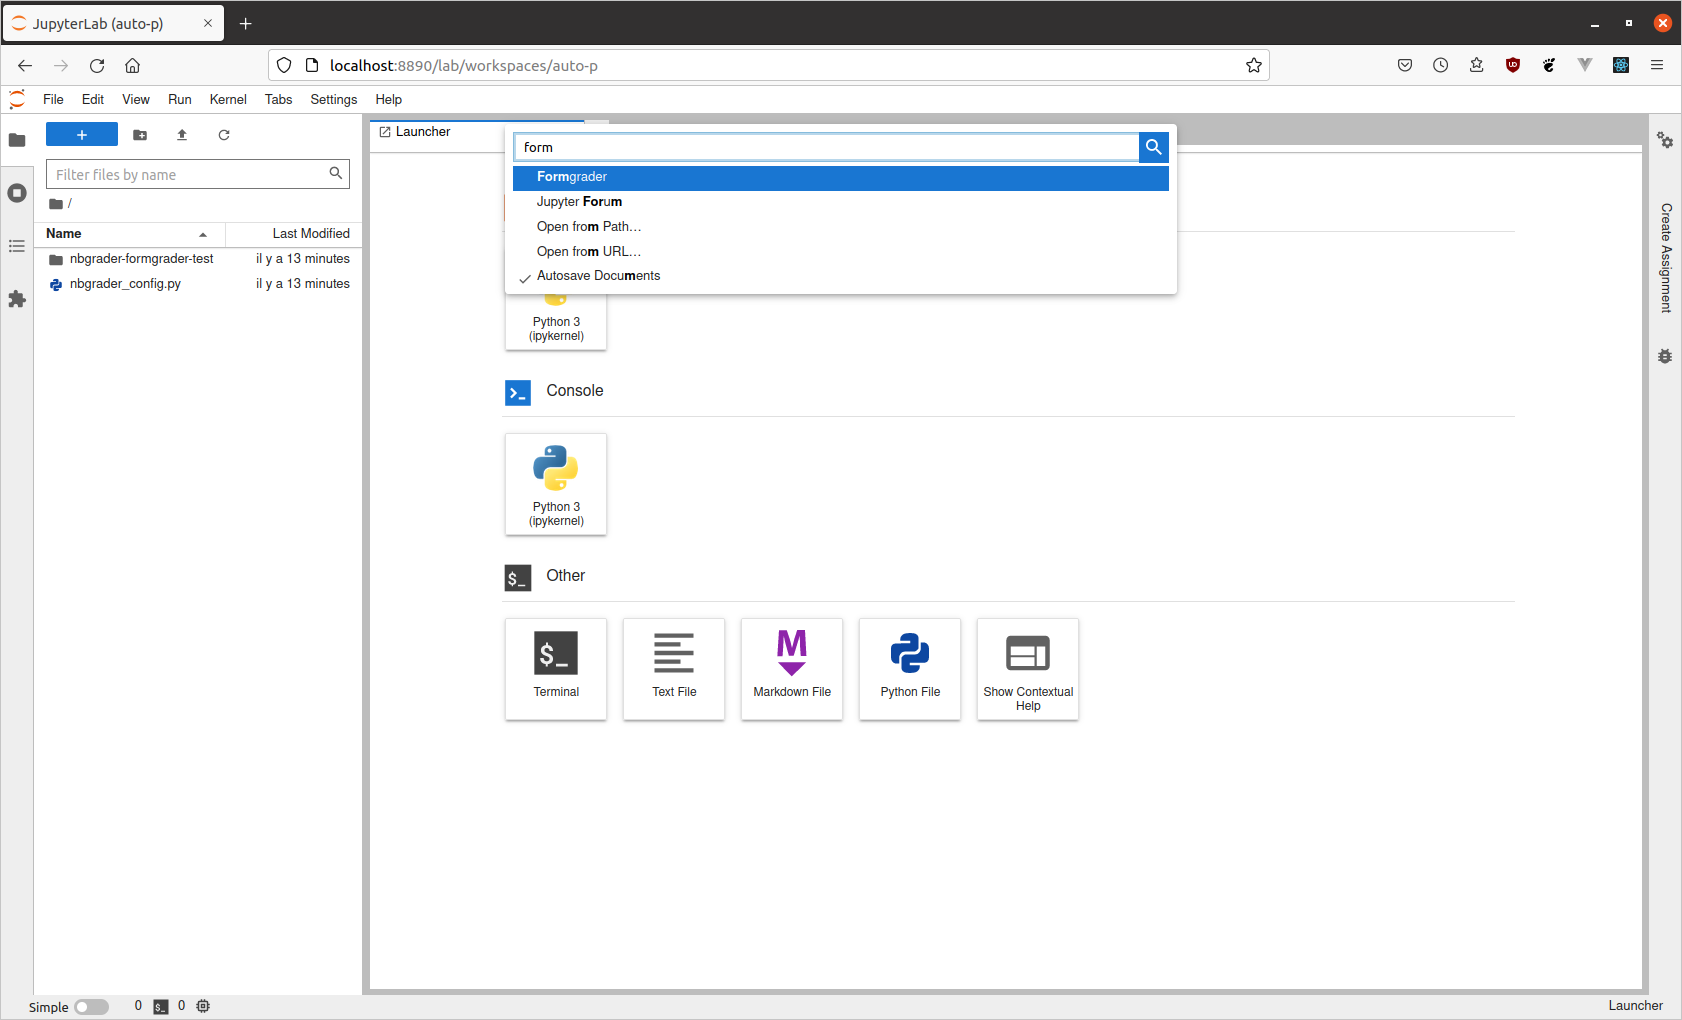
formgrader command palette
An new tab should open in Jupyter Lab :
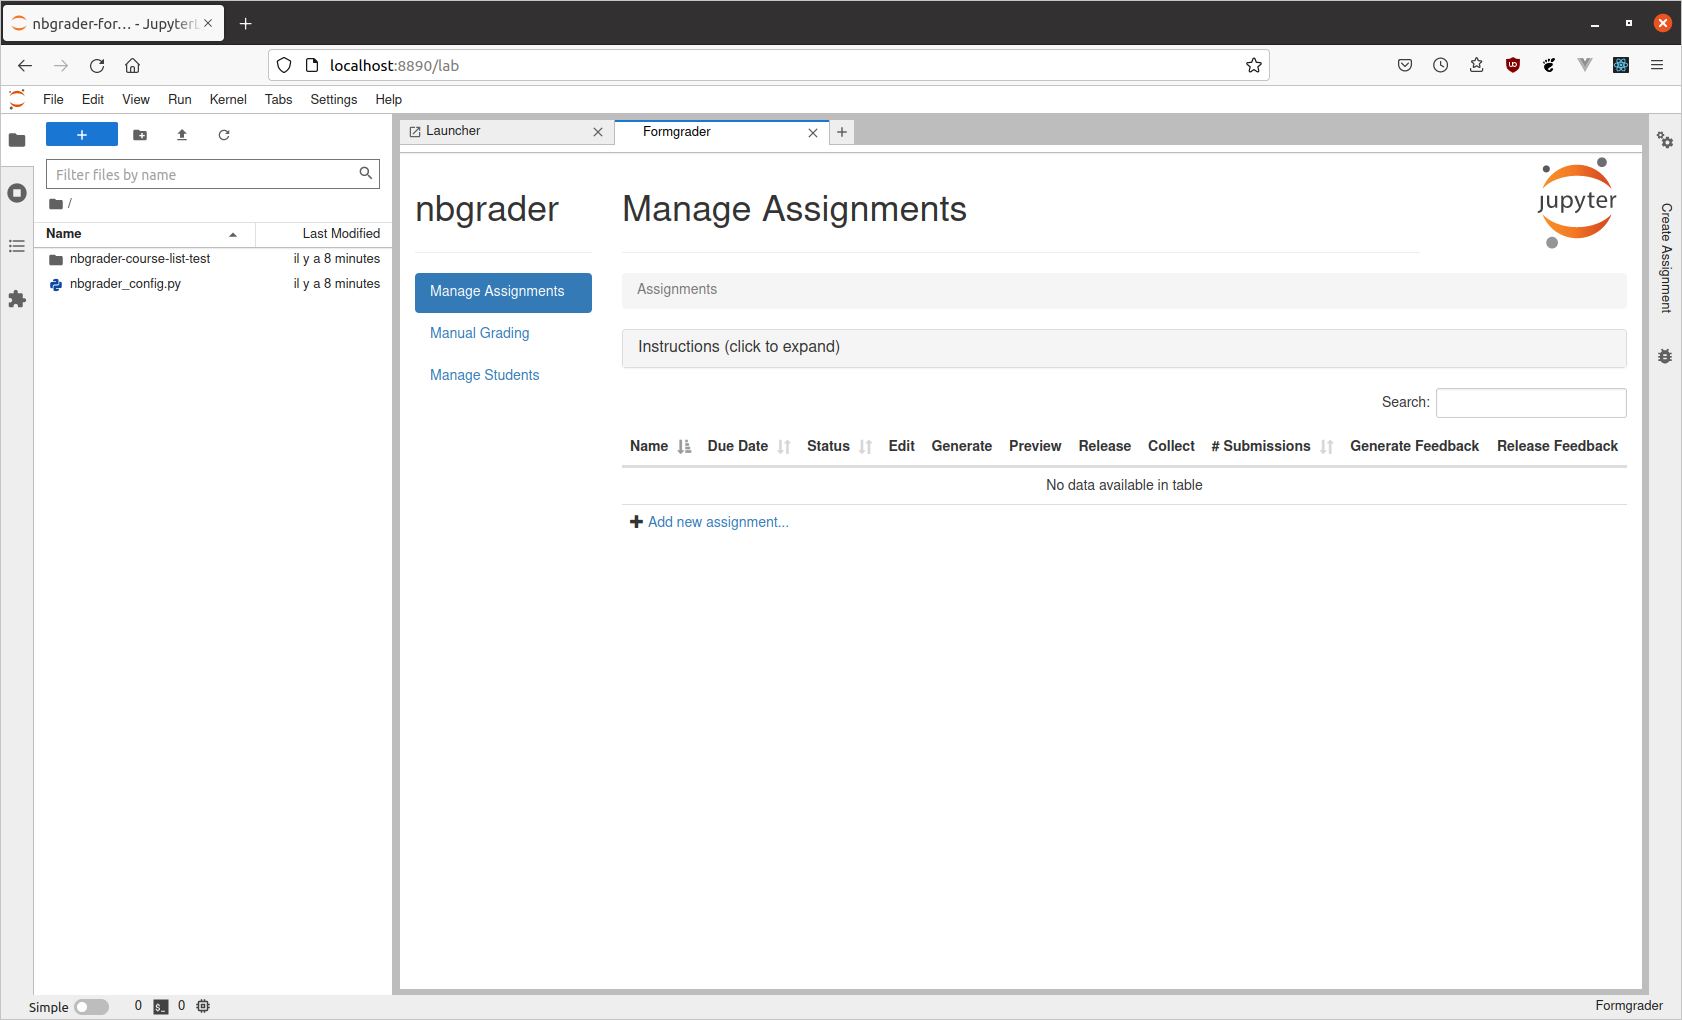
formgrader jlab tab
Creating a new assignment
See also
- Managing the database
Instructions on how to manage assignments in the database from the command line
- nbgrader db assignment add
Command line options for
nbgrader db assignment add
From the formgrader
To create a new assignment, open the formgrader extension and click the “Add new assignment…” button at the bottom of the page. This will ask you to provide some information such as the name of the assignment and its due date. Clicking the name of the assignment will open the assignment directory in the file browser (left panel), where files can be added :
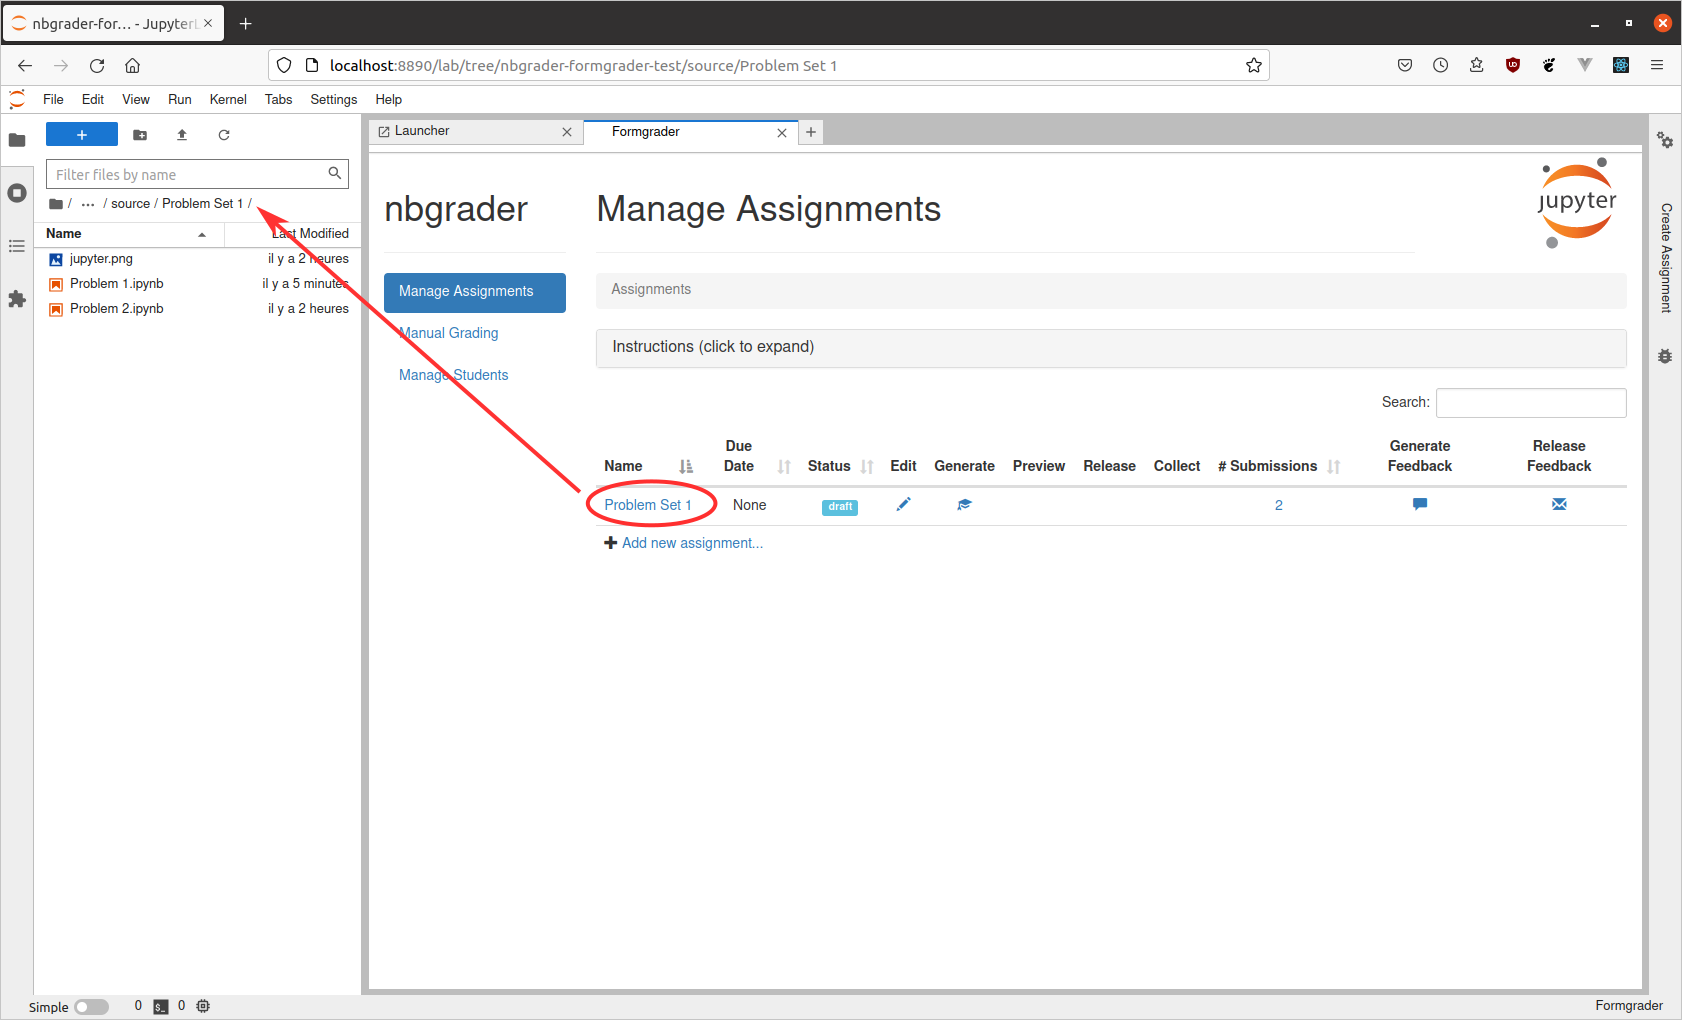
manage assignments open
From the command line
If you are not using the formgrader extension, you can add a new assignment simply by creating a folder in your course directory with the name of the assignment. You can specify the assignment metadata (such as the duedate) using the nbgrader db assignment command (see Managing the database).
To simplify this example, two notebooks of the assignment have already
been stored in the source/ps1 folder:
Developing assignments with the assignment toolbar
Note: As you are developing your assignments, you should save them
into the source/{assignment_id}/ folder of the nbgrader hierarchy,
where assignment_id is the name of the assignment you are creating
(e.g. “ps1”).
See also
- The philosophy and the approach
More details on how the nbgrader hierarchy is structured.
- Customizing how the student version of an assignment looks
Instructions for customizing how the student version of the assignment looks.
Before you can begin developing assignments, you will need to actually install the nbgrader toolbar. If you do not have it installed, please first follow the installation instructions.
Once the toolbar has been installed, you should see it the right panel:
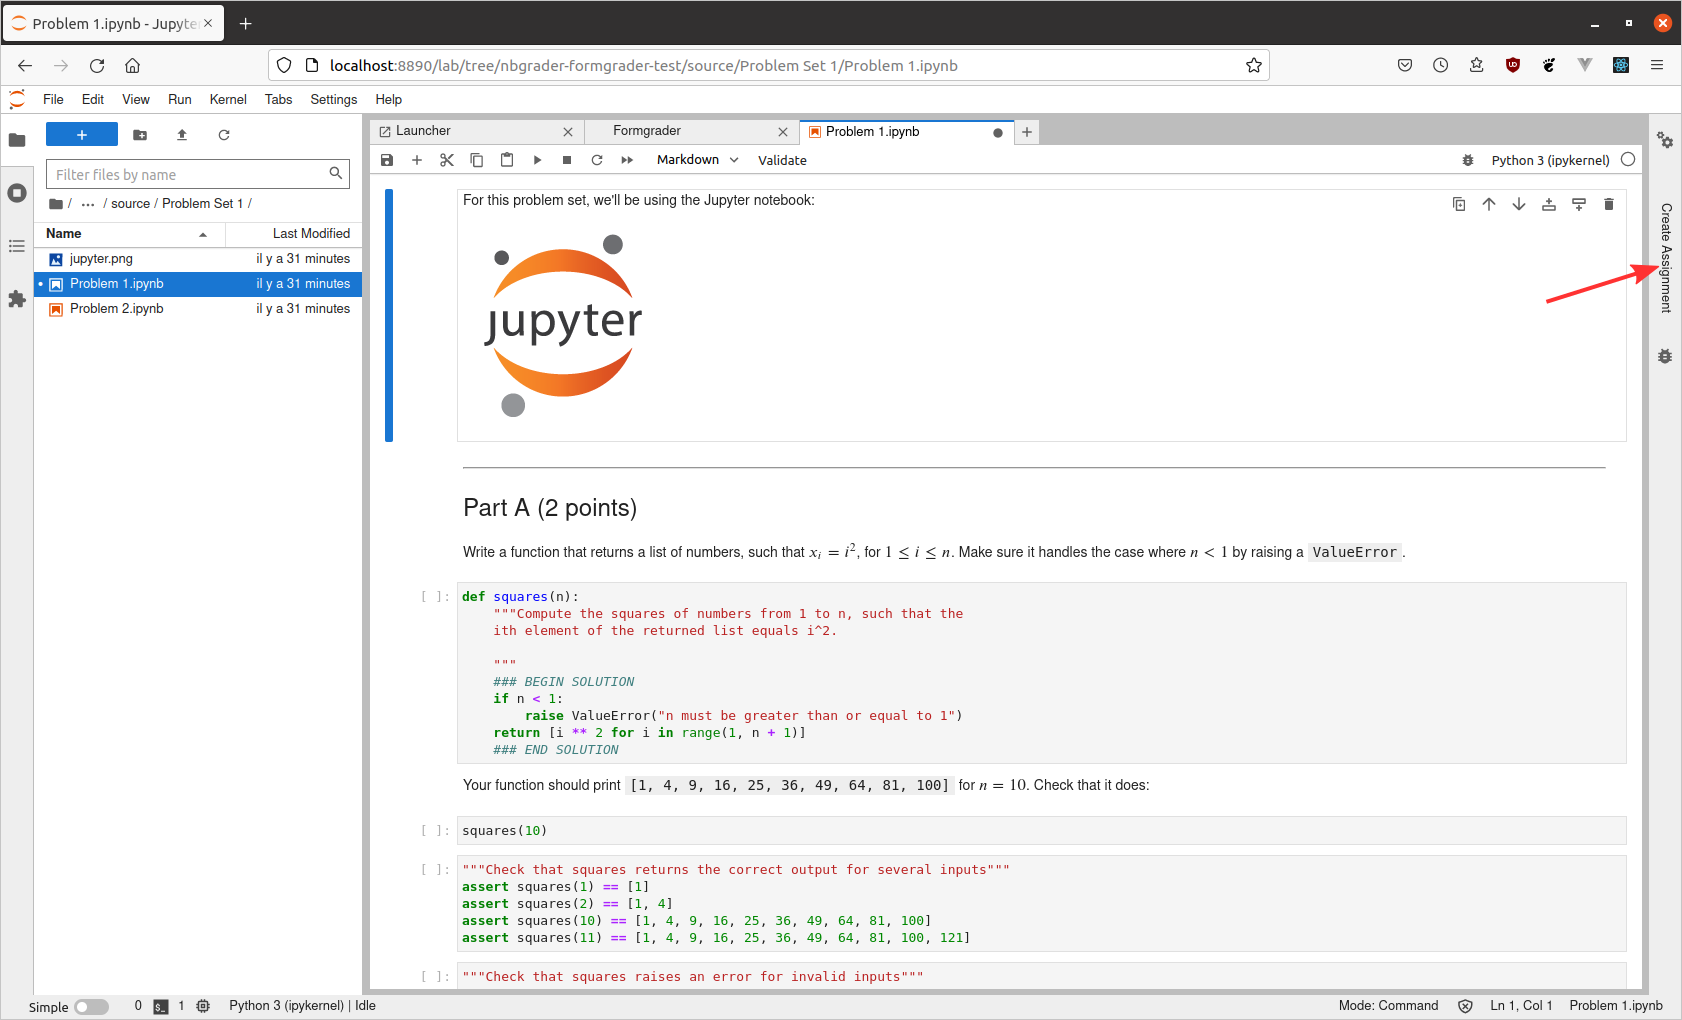
assignment toolbar button
In the “Create Assignment” toolbar, each cell has its own nbgrader menu (the blue bars let you know which one is selected) :
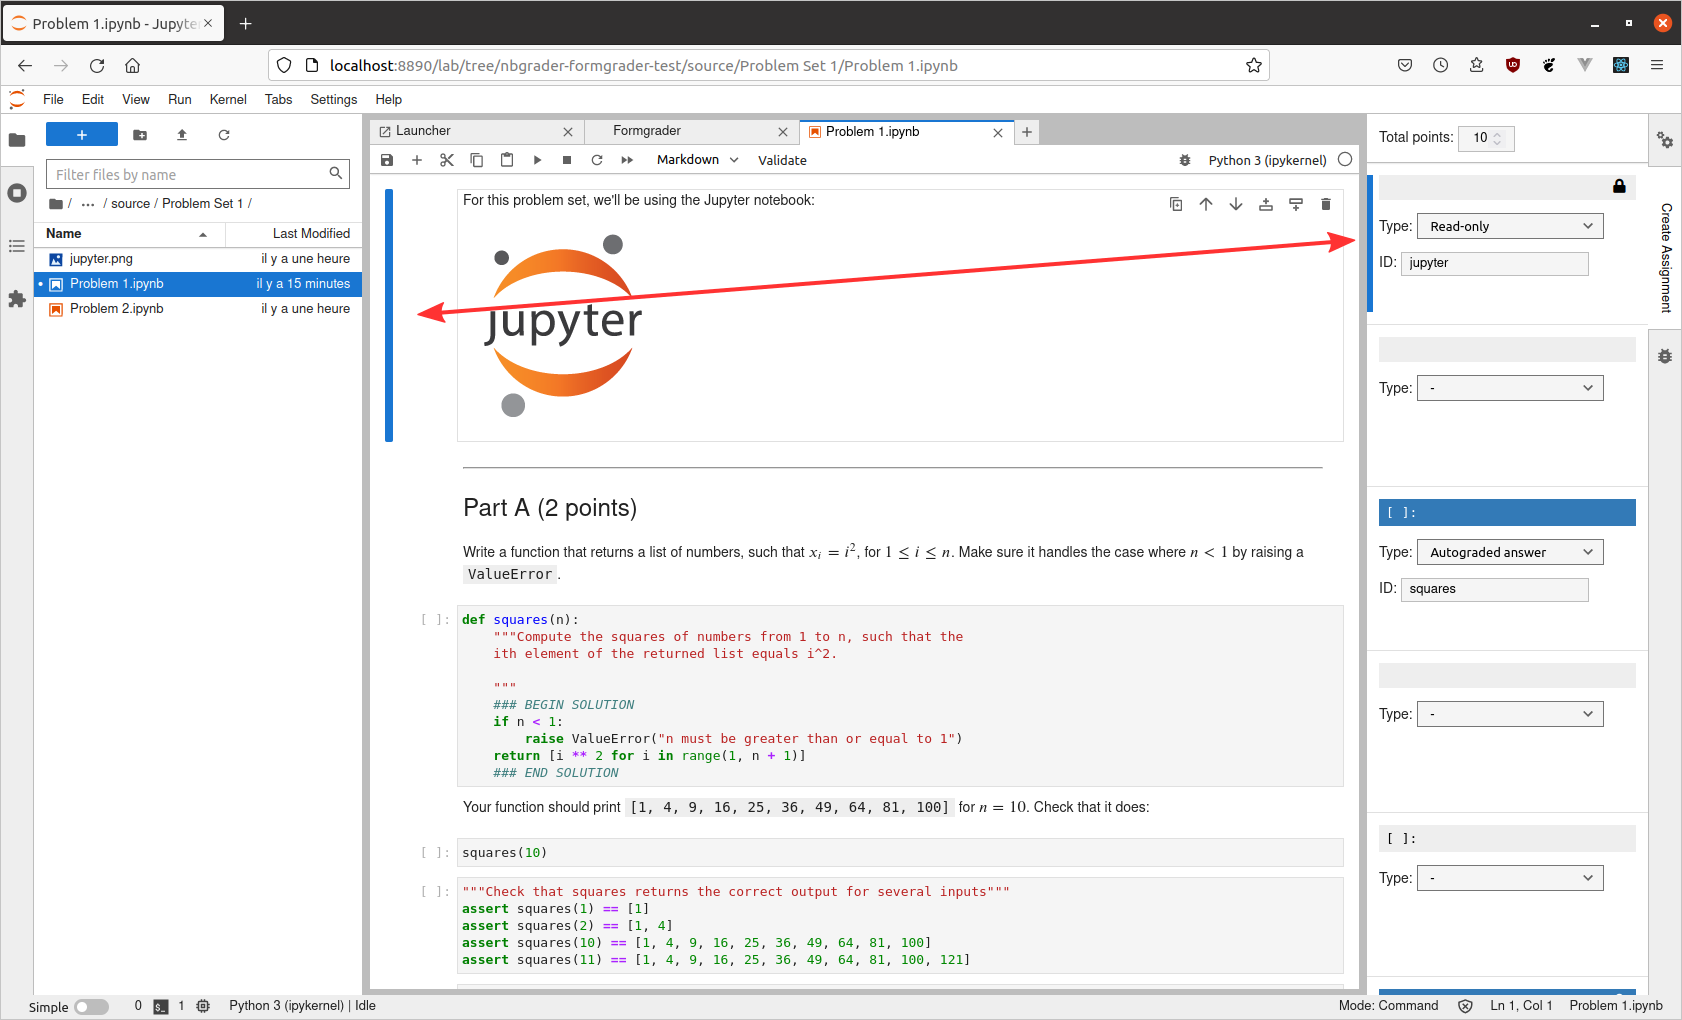
assignment toolbar blue bars
By default each cell will have a dropdown menu with the “-” item selected. For markdown cells, there are three additional options to choose from, either “Manually graded answer”, “Manually graded task” or “Read-only”:
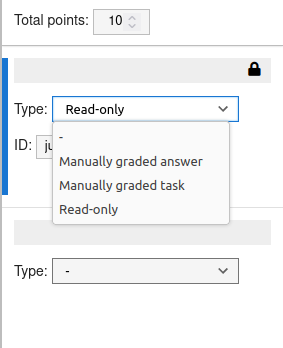
markdown cell
For code cells, there are five options to choose from, including “Manually graded answer”, “Manually graded task”, “Autograded answer”, “Autograder tests”, and “Read-only”:
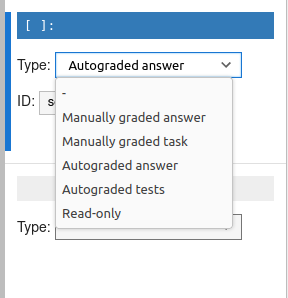
code cell
The following sections go into detail about the different cell types, and show cells that are taken from a complete example of an assignment generated with the nbgrader toolbar extension:
“Manually graded answer” cells
If you select the “Manually graded answer” option (available for both markdown and code cells), the nbgrader extension will mark that cell as a cell that contains an answer that must be manually graded by a human grader. Here is an example of a manually graded answer cell:

manually graded answer
The most common use case for this type of cell is for written free-response answers (for example, which interpret the results of code that may have been written and/or executed above).
When you specify a manually graded answer, you must additionally tell nbgrader how many points the answer is worth, and an id for the cell. Additionally, when creating the release version of the assignment (see Generate and release an assignment), the bodies of answer cells will be replaced with a code or text stub indicating to the students that they should put their answer or solution there. Please see Customizing how the student version of an assignment looks for details on how to customize this behavior.
“Manually graded task” cells
New in version 0.6.0.
If you select the “Manually graded task” option (available for markdown cells), the nbgrader extension will mark that cell as a cell that contains the description of a task that students have to perform. They must be manually graded by a human grader. Here is an example of a manually graded answer cell:

task cell source
The difference with a manually graded answer is that the manually graded tasks cells are not edited by the student. A manually or automatically graded cell ask students to perform a task in one cell. A manually graded task asks students to perform a task with cells.
The common use case for this type of cell is for tasks that require the student to create several cells such as “Process the data and create a plot to illustrate your results.” or to contain notebook-wide tasks such as “adhere to the PEP8 style convention.”
“Manually graded task” cells with mark scheme
New in version 0.6.0.
A mark scheme can be created through the use of a special syntax such as
=== BEGIN MARK SCHEME === and === END MARK SCHEME ===. The
section of text between the two markers will be removed from the student
version, but will be visible at the grading stage and in the feedback.
“Autograded answer” cells
If you select the “Autograded answer” option (available only for code cells), the nbgrader extension will mark that cell as a cell that contains an answer which will be autograded. Here is an example of an autograded graded answer cell:

autograded answer
As shown in the image above, solutions can be specified inline, through the use of a special syntax such as ### BEGIN SOLUTION and ### END SOLUTION. When creating the release version (see Generate and release an assignment), the region between the special syntax lines will be replaced with a code stub. If this special syntax is not used, then the entire contents of the cell will be replaced with the code stub. Please see Customizing how the student version of an assignment looks for details on how to customize this behavior.
Unlike manually graded answers, autograded answers aren’t worth any points: instead, the points for autograded answers are specified for the particular tests that grade those answers. See the next section for further details.
“Autograder tests” cells
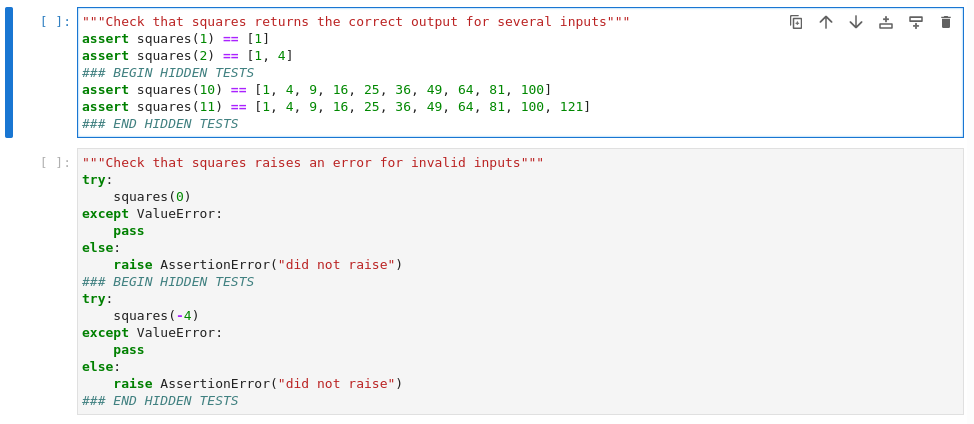
If you select the “Autograder tests” option (available only for code cells), the nbgrader extension will mark that cell as a cell that contains tests to be run during autograding. Here is an example of two test cells:

autograder tests
Test cells should contain assert statements (or similar). When run through nbgrader autograde (see Autograde assignments), the cell will pass if no errors are raised, and fail otherwise. You must specify the number of points that each test cell is worth; then, if the tests pass during autograding, students will receive the specified number of points, and otherwise will receive zero points.
The lock icon on the right side of the assignment toolbar indicates that the tests are “read-only”. See the next section for further details on what this means.
For tips on writing autograder tests, see Autograding resources.
“Autograder tests” cells with automatically generated test code
New in version 0.9.0.
Tests in “Autograder tests” cells can be automatically and dynamically
generated through the use of the special syntax ### AUTOTEST and
### HASHED AUTOTEST. This syntax allows you to specify only the
objects you want to test, rather than having to write the test code
yourself manually; nbgrader will generate the test code for you. For
example, 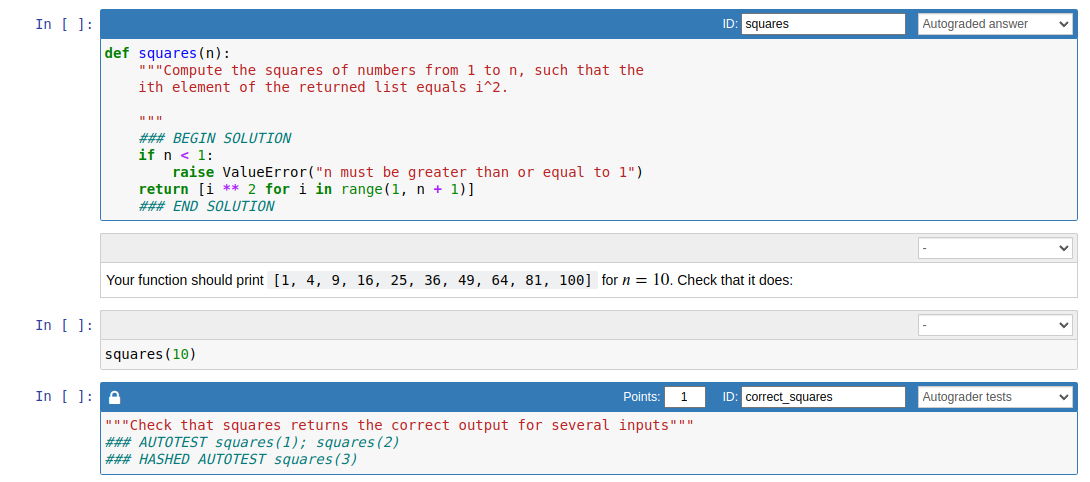
In this example, the instructor wants to test that the returned value of
squares(1), squares(2), and squares(3) lines up with the
value from the source copy. In the release copy, the above autotest
statements will be converted to the following test code that the
students see: 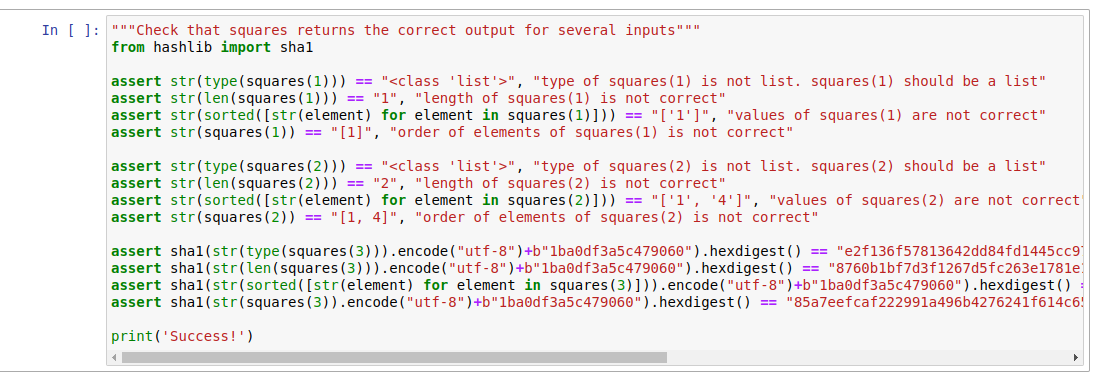
When creating the release version (see Generate and release an assignment), the autotest lines (lines starting with the special syntax) will transform into automatically generated test cases (i.e., assert statements). The value of the expression(s) following the special syntax will be evaluated in the solution version to generate test cases that are checked in the student version. If this special syntax is not used, then the contents of the cell will remain as-is.
Note
Lines starting with ### AUTOTEST will generate test code where the answer is visible to students. In the example above, the tests for squares(1) and squares(2) can be examined by students to see the answer. To generate test code that students can run, but where the answers are not viewable by students (they are hashed), begin the line with the syntax ### HASHED AUTOTEST instead. You can also make ### AUTOTEST and ### HASHED AUTOTEST statements hidden and not runnable by students by wrapping them in ### BEGIN HIDDEN TESTS and ### END HIDDEN TESTS as in “Autograder tests” cells with hidden tests
Note
You can put multiple expressions to be tested on a single ### AUTOTEST line (or ### HASHED AUTOTEST line), separated by semicolons.
Note
You can follow the ### AUTOTEST or ### HASHED AUTOTEST syntax with any valid Python expression. Test code will be automatically generated based on the return type of that expression. See Automatic test code generation for more technical details about how ### AUTOTEST and ### HASHED AUTOTEST statements are converted into test code, and how to customize this process.
“Read-only” cells
If you select the “Read-only” option (available for both code and markdown cells), the nbgrader extension will mark that cell as one that cannot be modified. This is indicated by a lock icon on the left side of the cell toolbar:

read only
This functionality is particularly important for test cells, which are always marked as read-only. Because the mechanism for autograding is that students receive full credit if the tests pass, an easy way to get around this would be to simply delete or comment out the tests. This read-only functionality will reverse any such changes made by the student.
Validating the instructor version
See also
- nbgrader validate
Command line options for
nbgrader validate
From the validate extension
Ideally, the solutions in the instructor version should be correct and pass all the test cases to ensure that you are giving your students tests that they can actually pass. To verify this is the case, you can use the validate extension:
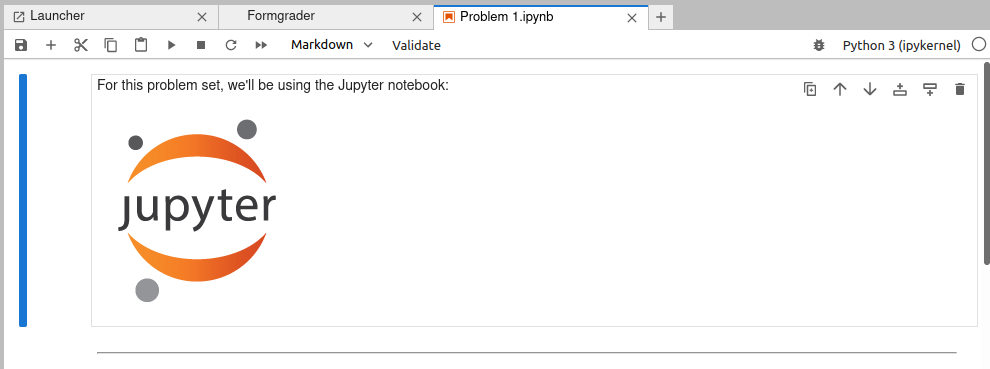
validate extension
If your assignment passes all the tests, you’ll get a success pop-up:
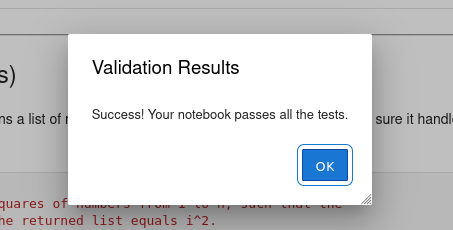
validate success
If it doesn’t pass all the tests, you’ll get a message telling you which cells failed:
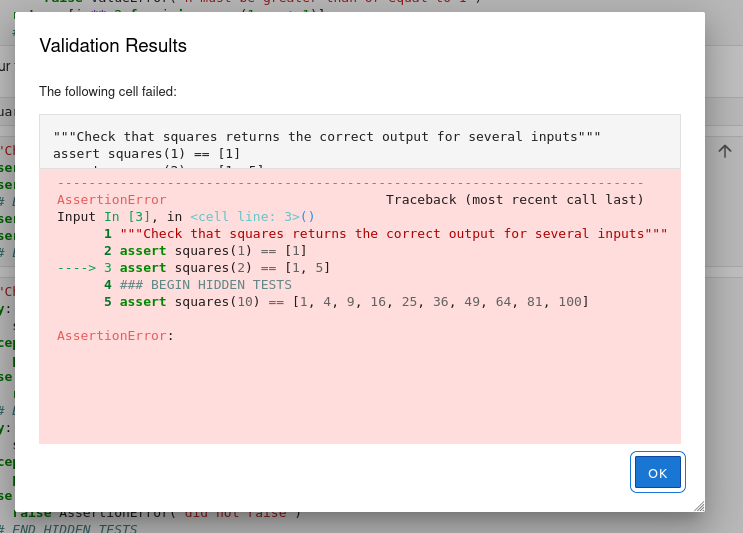
validate failed
From the command line
You can also validate assignments on the command line using the
nbgrader validate command:
%%bash

nbgrader validate source/ps1/*.ipynb
[ValidateApp | WARNING] No nbgrader_config.py file found (rerun with --debug to see where nbgrader is looking)
[ValidateApp | INFO] Validating '[NB_GRADER_ROOT]/nbgrader/docs/source/user_guide/source/ps1/problem1.ipynb'
0.00s - Debugger warning: It seems that frozen modules are being used, which may
0.00s - make the debugger miss breakpoints. Please pass -Xfrozen_modules=off
0.00s - to python to disable frozen modules.
0.00s - Note: Debugging will proceed. Set PYDEVD_DISABLE_FILE_VALIDATION=1 to disable this validation.
[ValidateApp | INFO] Validating '[NB_GRADER_ROOT]/nbgrader/docs/source/user_guide/source/ps1/problem2.ipynb'
0.00s - Debugger warning: It seems that frozen modules are being used, which may
0.00s - make the debugger miss breakpoints. Please pass -Xfrozen_modules=off
0.00s - to python to disable frozen modules.
0.00s - Note: Debugging will proceed. Set PYDEVD_DISABLE_FILE_VALIDATION=1 to disable this validation.
Success! Your notebook passes all the tests.
Success! Your notebook passes all the tests.
Generate and release an assignment
See also
- nbgrader generate assignment
Command line options for
nbgrader generate_assignment- The philosophy and the approach
Details about how the directory hierarchy is structured
- Configuration options
Details on
nbgrader_config.py
From the formgrader
After an assignment has been created with the assignment toolbar, you will want to generate the version that students will receive. You can do this from the formgrader by clicking the “generate” button:
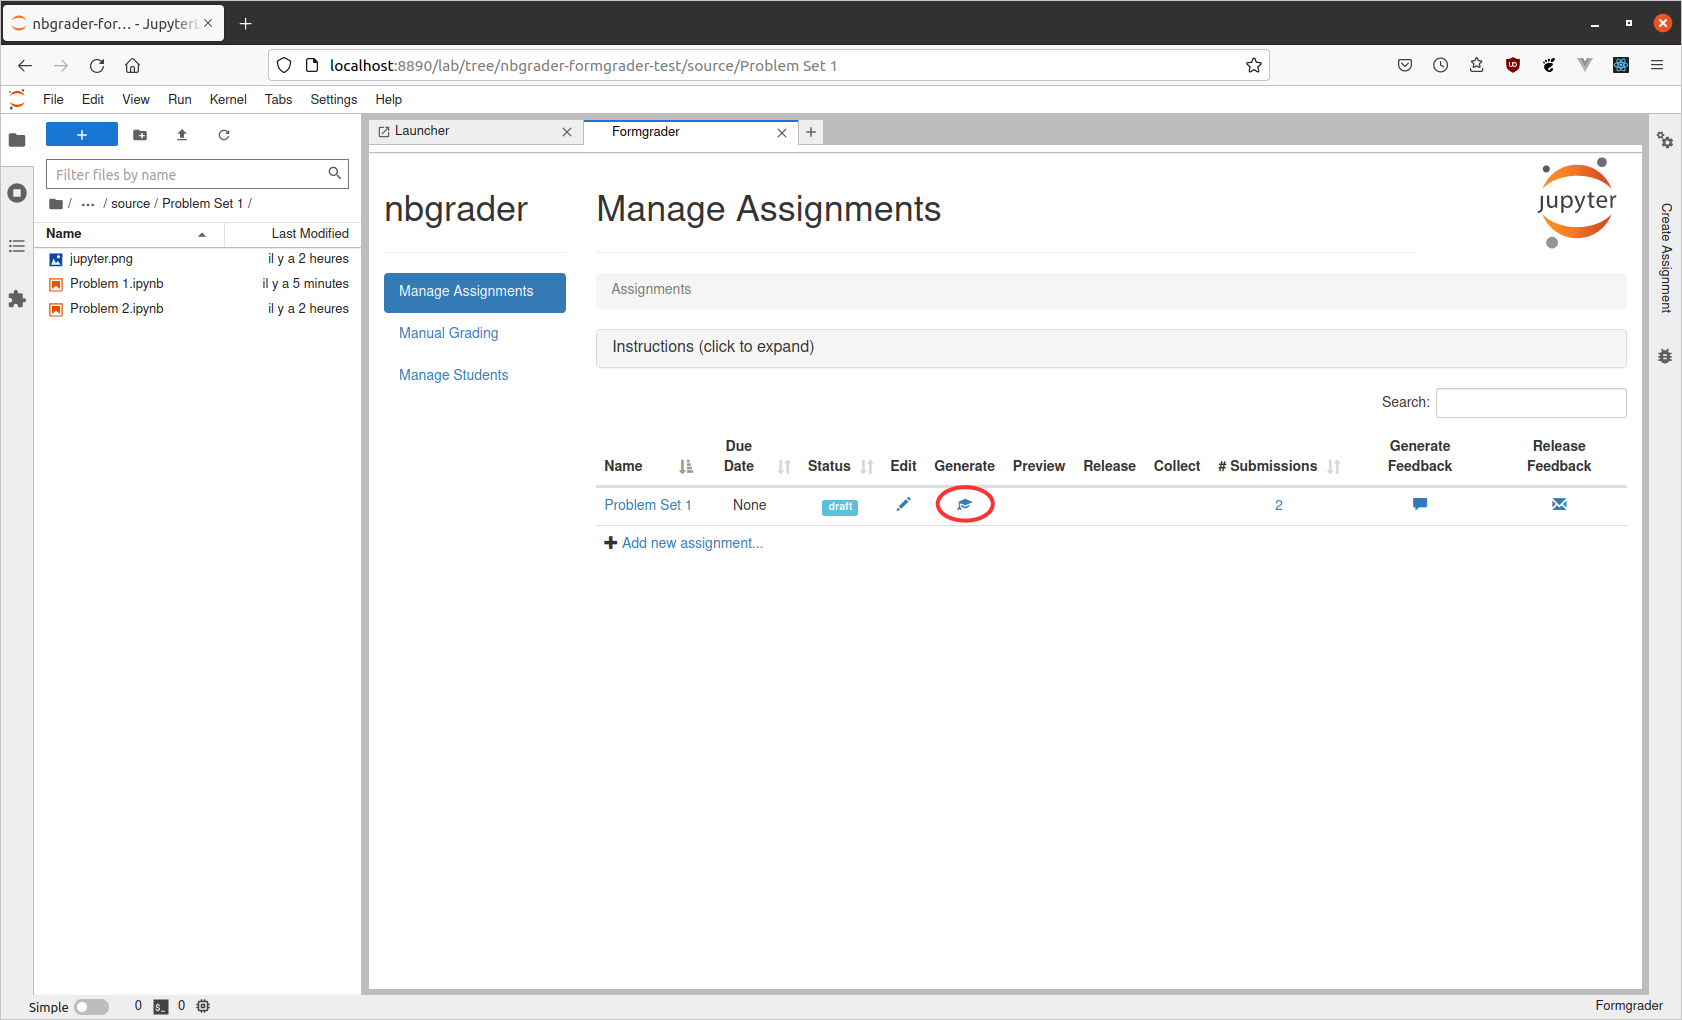
manage assignments generate
This should succeed with a pop-up window containing log output:
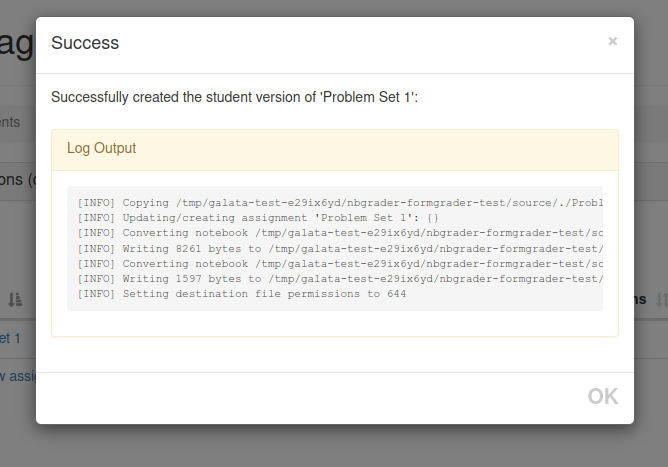
generate assignment
From the command line
As described in The philosophy and the approach, you need to organize your files in a particular way. For releasing assignments, you should have the master copy of your files saved (by default) in the following source directory structure:
{course_directory}/source/{assignment_id}/{notebook_id}.ipynb
Note: The student_id is not included here because the source and
release versions of the assignment are the same for all students.
After running nbgrader generate_assignment, the release version of
the notebooks will be:
{course_directory}/release/{assignment_id}/{notebook_id}.ipynb
As a reminder, the instructor is responsible for distributing this release version to their students using their institution’s existing student communication and document distribution infrastructure.
When running nbgrader generate_assignment, the assignment name
(which is “ps1”) is passed. We also specify a header notebook
(source/header.ipynb) to prepend at the beginning of each notebook
in the assignment. By default, this command should be run from the root
of the course directory:
%%bash

nbgrader generate_assignment "ps1" --IncludeHeaderFooter.header=source/header.ipynb --force
[GenerateAssignmentApp | WARNING] No nbgrader_config.py file found (rerun with --debug to see where nbgrader is looking)
[GenerateAssignmentApp | INFO] Copying [NB_GRADER_ROOT]/nbgrader/docs/source/user_guide/source/./ps1/jupyter.png -> [NB_GRADER_ROOT]/nbgrader/docs/source/user_guide/release/./ps1/jupyter.png
[GenerateAssignmentApp | INFO] Updating/creating assignment 'ps1': {}
[GenerateAssignmentApp | INFO] Converting notebook [NB_GRADER_ROOT]/nbgrader/docs/source/user_guide/source/./ps1/problem1.ipynb
[GenerateAssignmentApp | INFO] Writing [size] bytes to [NB_GRADER_ROOT]/nbgrader/docs/source/user_guide/release/ps1/problem1.ipynb
[GenerateAssignmentApp | INFO] Converting notebook [NB_GRADER_ROOT]/nbgrader/docs/source/user_guide/source/./ps1/problem2.ipynb
[GenerateAssignmentApp | INFO] Writing [size] bytes to [NB_GRADER_ROOT]/nbgrader/docs/source/user_guide/release/ps1/problem2.ipynb
[GenerateAssignmentApp | INFO] Setting destination file permissions to 644
Preview the student version
After generating the student version of assignment, you should preview it to make sure that it looks correct. You can do this from the formgrader extension by clicking the “preview” button:
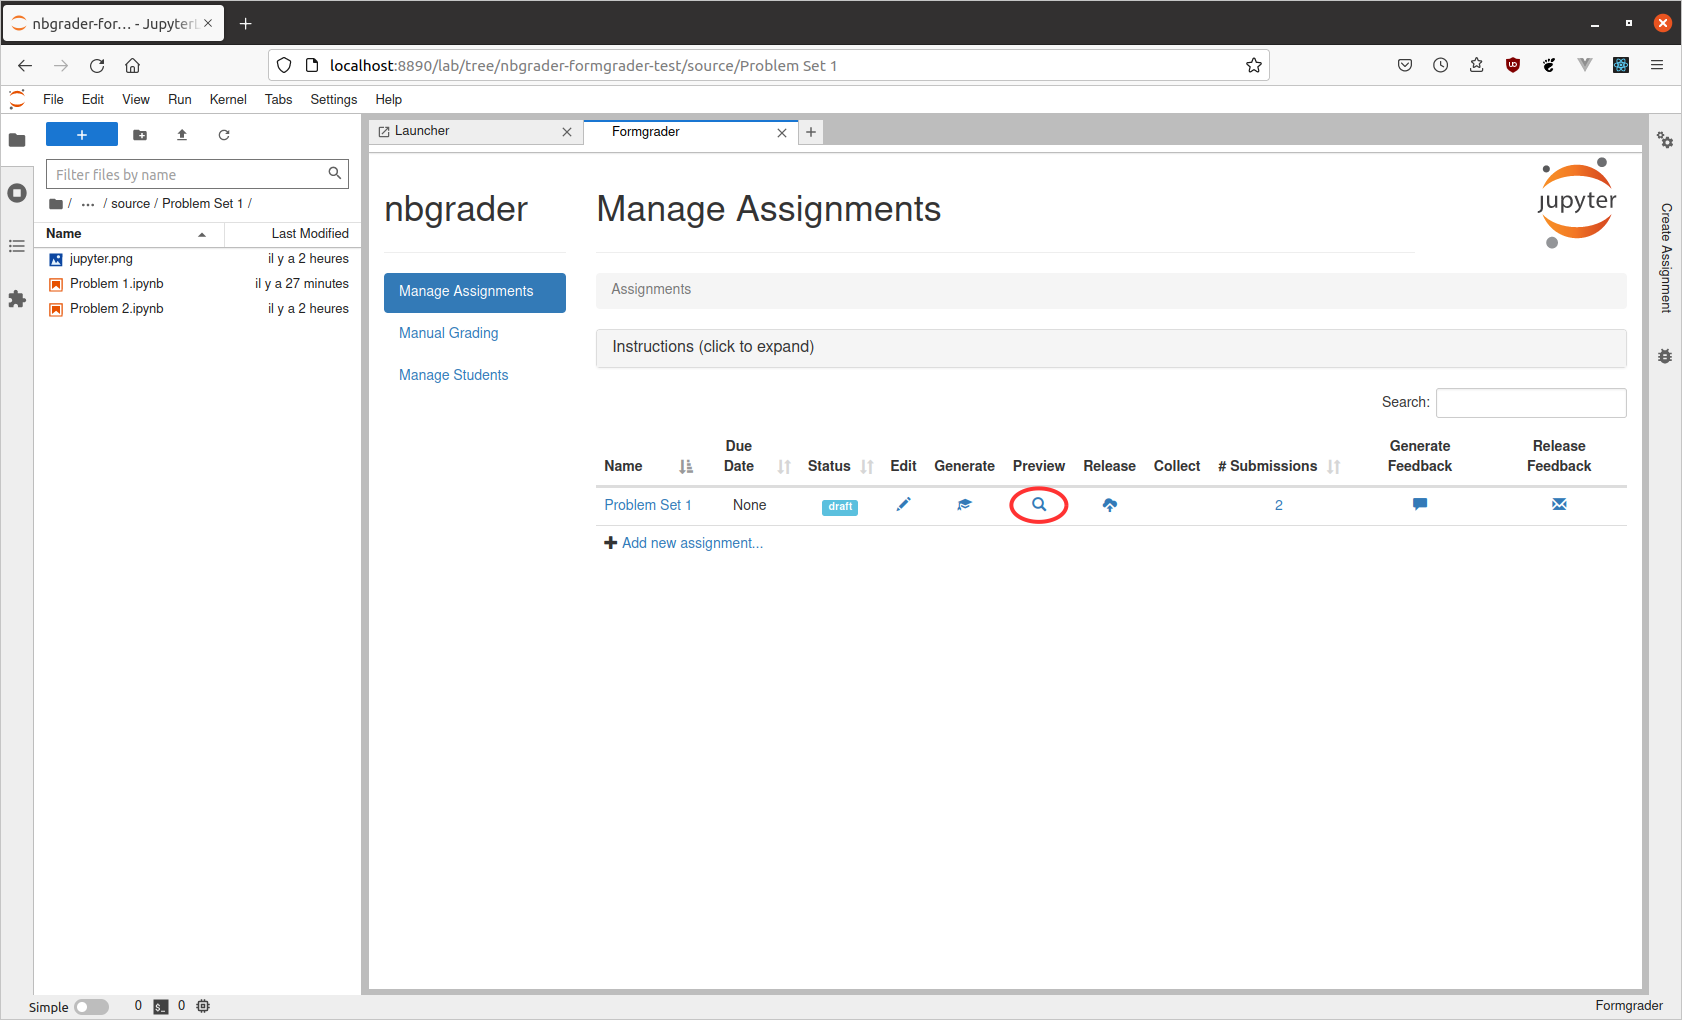
manage assignments preview
Under the hood, there will be a new folder called release with the
same structure as source. The release folder contains the actual
release version of the assignment files:
If you are working on the command line, you may want to formally verify
the student version as well. Ideally, all the tests should fail in the
student version if the student hasn’t implemented anything. To verify
that this is in fact the case, we can use the
nbgrader validate --invert command:
%%bash

nbgrader validate --invert release/ps1/*.ipynb
[ValidateApp | WARNING] No nbgrader_config.py file found (rerun with --debug to see where nbgrader is looking)
[ValidateApp | INFO] Validating '[NB_GRADER_ROOT]/nbgrader/docs/source/user_guide/release/ps1/problem1.ipynb'
0.00s - Debugger warning: It seems that frozen modules are being used, which may
0.00s - make the debugger miss breakpoints. Please pass -Xfrozen_modules=off
0.00s - to python to disable frozen modules.
0.00s - Note: Debugging will proceed. Set PYDEVD_DISABLE_FILE_VALIDATION=1 to disable this validation.
[ValidateApp | INFO] Validating '[NB_GRADER_ROOT]/nbgrader/docs/source/user_guide/release/ps1/problem2.ipynb'
0.00s - Debugger warning: It seems that frozen modules are being used, which may
0.00s - make the debugger miss breakpoints. Please pass -Xfrozen_modules=off
0.00s - to python to disable frozen modules.
0.00s - Note: Debugging will proceed. Set PYDEVD_DISABLE_FILE_VALIDATION=1 to disable this validation.
Success! The notebook does not pass any tests.
Success! The notebook does not pass any tests.
If the notebook fails all the test cases, you should see the message “Success! The notebook does not pass any tests.”
Releasing files to students and collecting submissions
See also
- Exchanging assignment files
Guide to releasing and collecting submissions.
- nbgrader release assignment
Command line options for
nbgrader release_assignment- nbgrader collect
Command line options for
nbgrader collect- The philosophy and the approach
Details about how the directory hierarchy is structured
- Configuration options
Details on
nbgrader_config.py
Note: the Managing Assignment Files Guide goes into greater depth on how to release and collect assignments, and the various options that are available to do you for doing so.
At this point you will be able to take the files in the release folder and distribute them to students. If you are using nbgrader with JupyterHub, you can do this with either with the formgrader extension or with the nbgrader release_assignment command (see Exchanging assignment files). Otherwise, you will need to do this manually.
Similarly, to collect submissions, you can do this either with the formgrader extension or with the nbgrader collect command. Otherwise, you will need to manually place submitted files into the submitted directory. As described in The philosophy and the approach, you need to organize your files in a particular way. For submitted assignments, you should have the submitted versions of students’ assignments organized as follows:
submitted/{student_id}/{assignment_id}/{notebook_id}.ipynb
Please note: Students must use version 3 or greater of the IPython/Jupyter notebook for nbgrader to work properly. If they are not using version 3 or greater, it is possible for them to delete cells that contain important metadata for nbgrader. With version 3 or greater, there is a feature in the notebook that prevents cells from being deleted. See this issue for more details.
To ensure that students have a recent enough version of the notebook, you can include a cell such as the following in each notebook of the assignment:
import IPython
assert IPython.version_info[0] >= 3, "Your version of IPython is too old, please update it."
Autograde assignments
See also
- nbgrader autograde
Command line options for
nbgrader autograde- The philosophy and the approach
Details about how the directory hierarchy is structured
- Configuration options
Details on
nbgrader_config.py
In the following example, we have an assignment with two notebooks. There are two submissions of the assignment:
Submission 1:
Submission 2:
From the formgrader
You can autograde individual submissions from the formgrader directly. To do so, click on the the number of submissions in the “Manage Assignments” view:
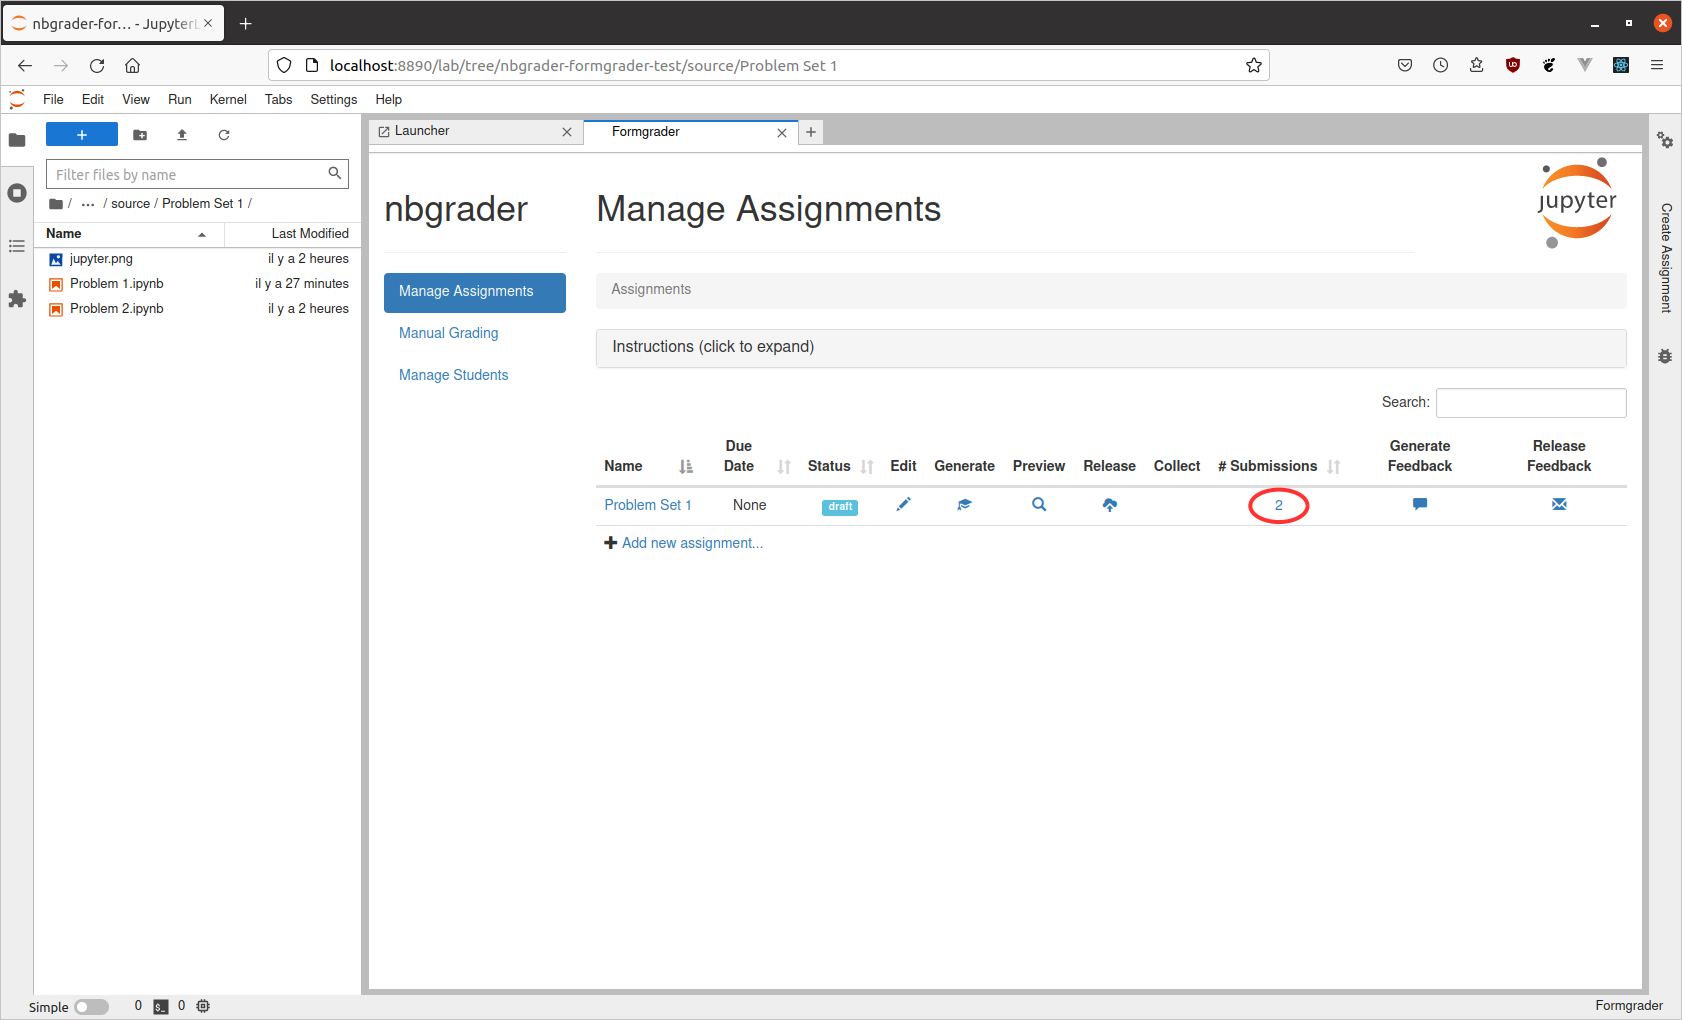
manage assignments submission
This will take you to a new page where you can see all the submissions. For a particular submission, click the “autograde” button to autograde it:
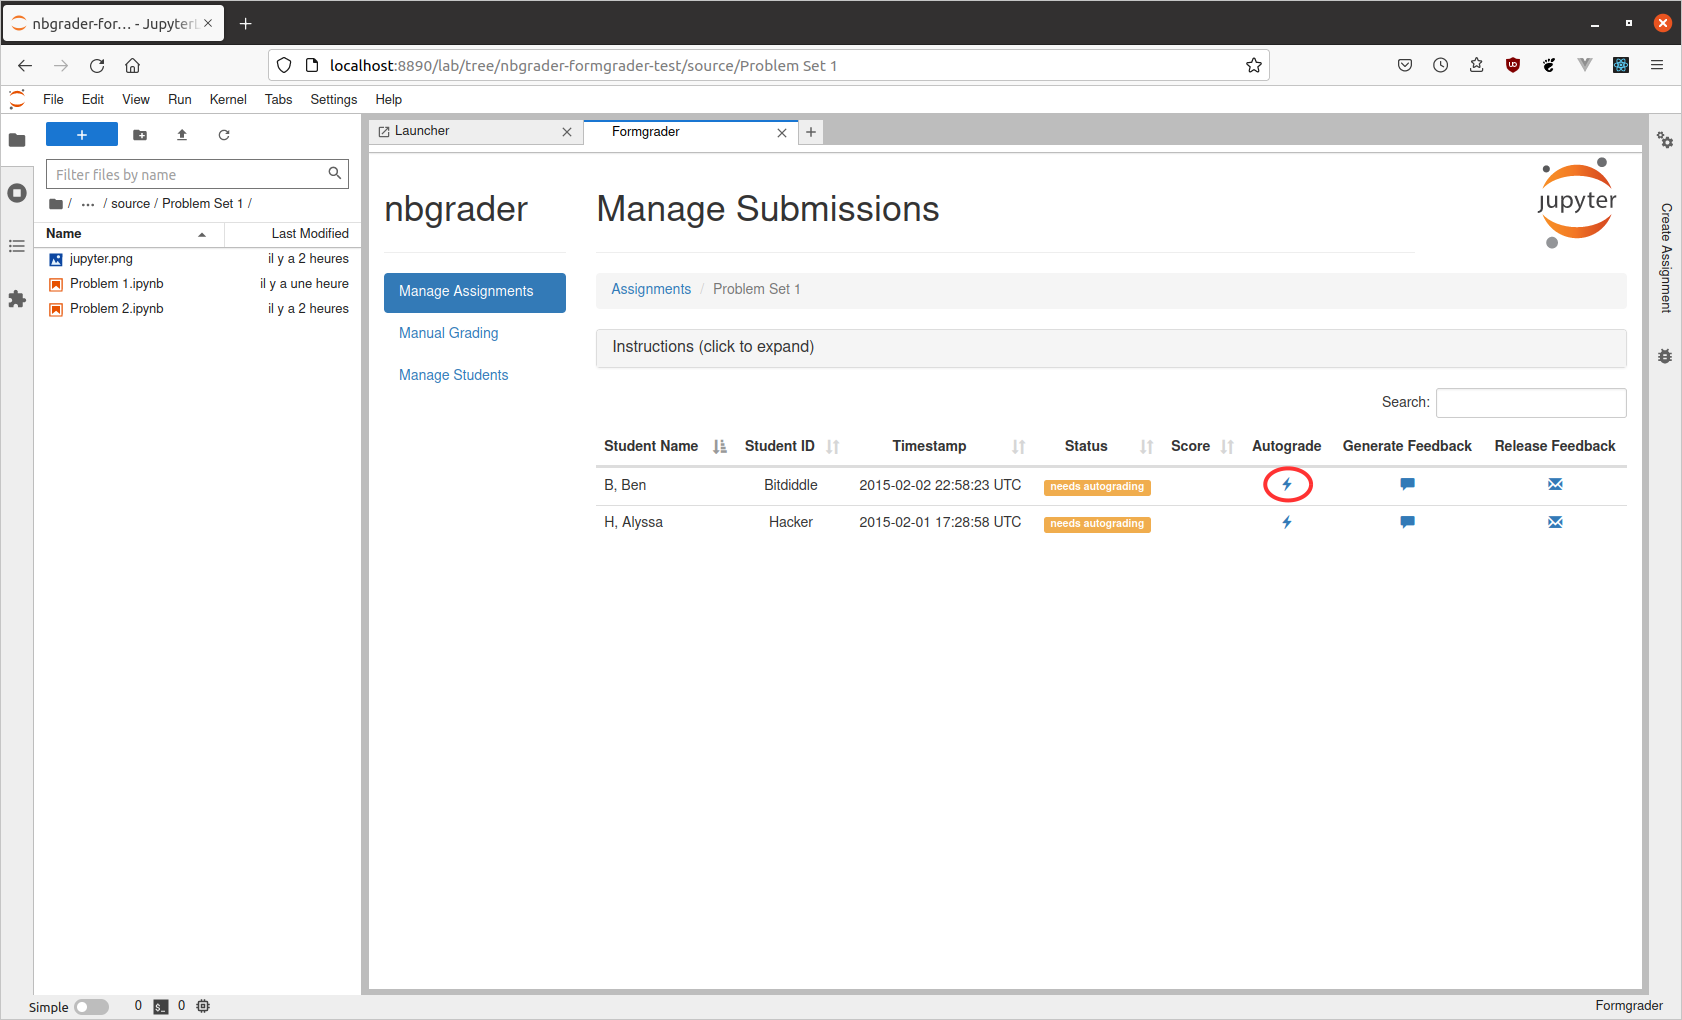
manage submissions autograde
After autograding completes, you will see a pop-up window with log output:
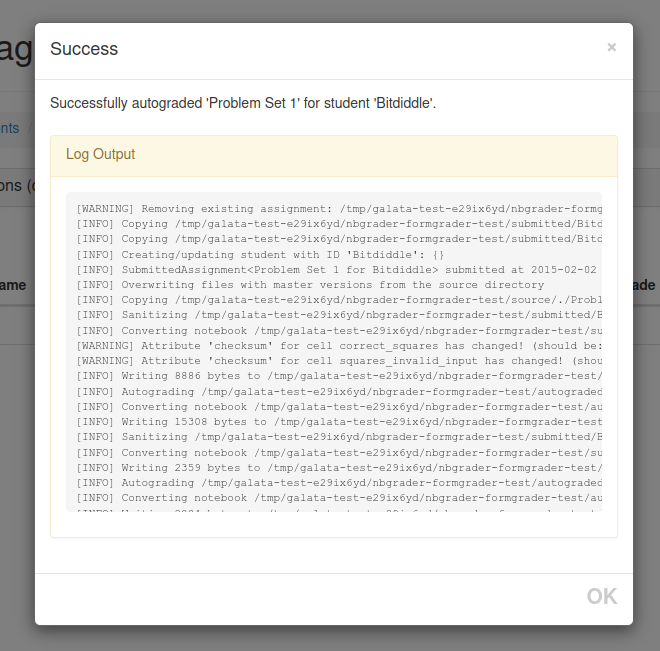
autograde assignment
And back on the submissions screen, you will see that the status of the submission has changed to “needs manual grading” and there is now a reported score as well:
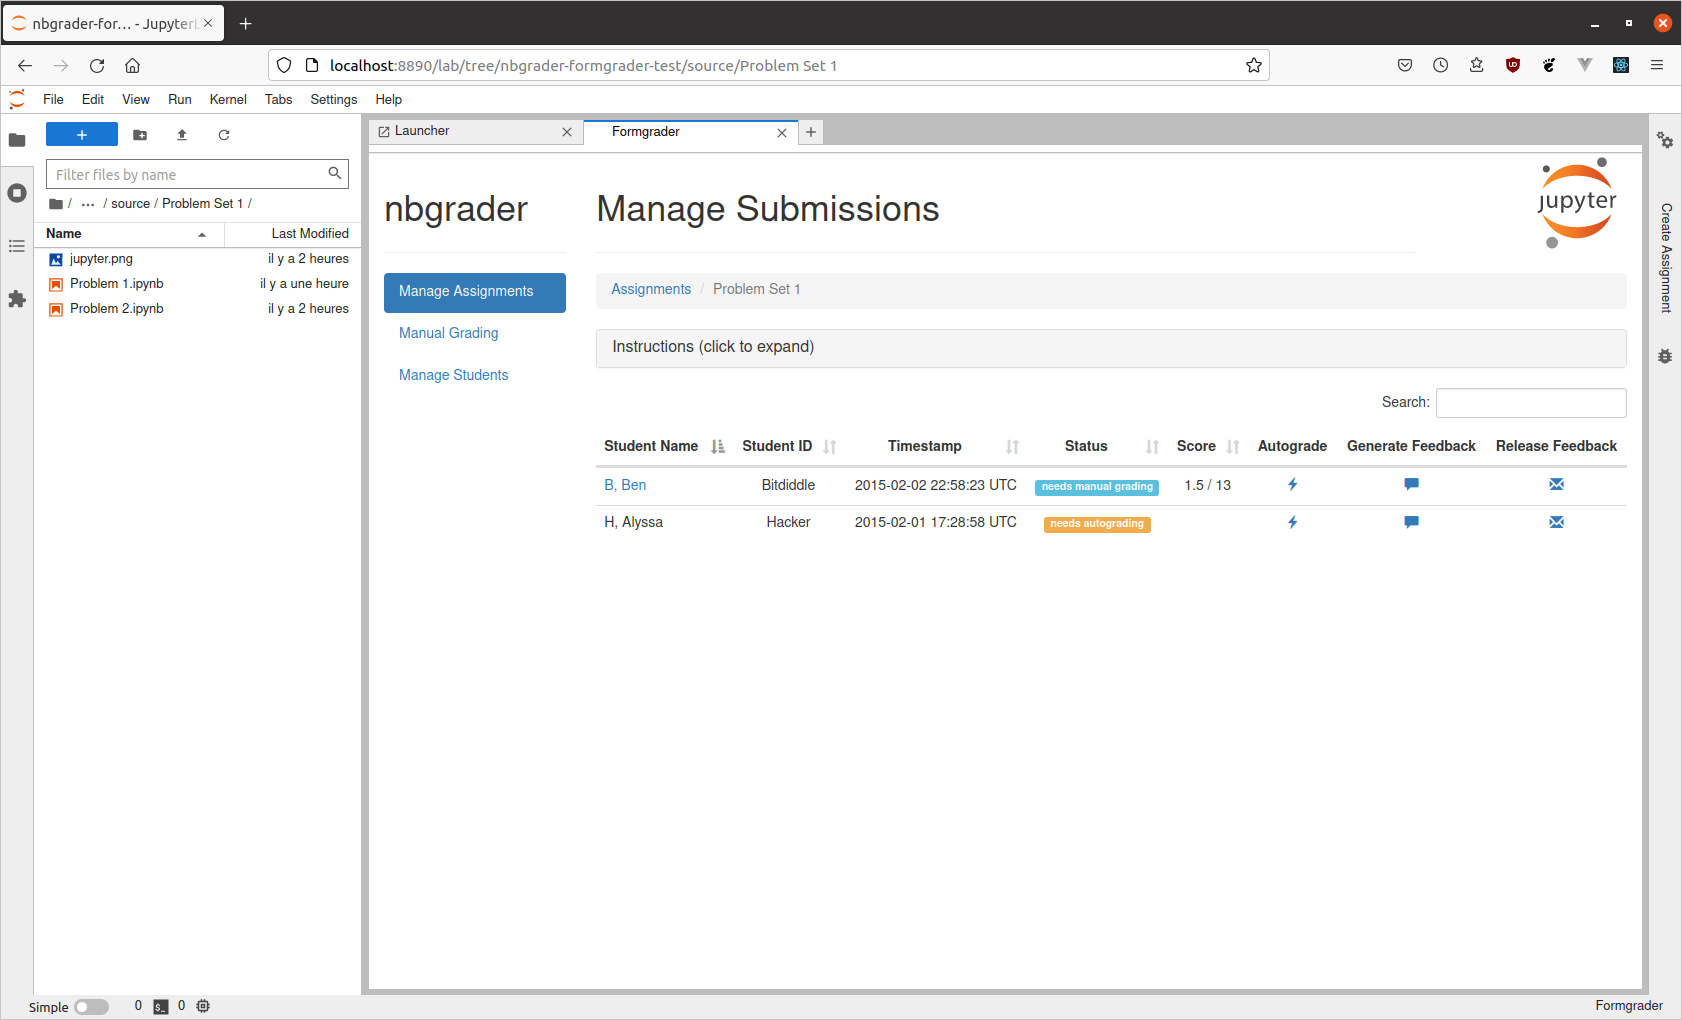
manage submissions manual
From the command line
We can run the autograder for all students at once from the command line:
%%bash

nbgrader autograde "ps1" --force
[AutogradeApp | WARNING] No nbgrader_config.py file found (rerun with --debug to see where nbgrader is looking)
[AutogradeApp | INFO] Copying [NB_GRADER_ROOT]/nbgrader/docs/source/user_guide/submitted/bitdiddle/ps1/timestamp.txt -> [NB_GRADER_ROOT]/nbgrader/docs/source/user_guide/autograded/bitdiddle/ps1/timestamp.txt
[AutogradeApp | INFO] Copying [NB_GRADER_ROOT]/nbgrader/docs/source/user_guide/submitted/bitdiddle/ps1/jupyter.png -> [NB_GRADER_ROOT]/nbgrader/docs/source/user_guide/autograded/bitdiddle/ps1/jupyter.png
[AutogradeApp | INFO] Creating/updating student with ID 'bitdiddle': {}
[NB_GRADER_ROOT]/nbgrader/api.py:2256: SAWarning: Object of type <SubmittedAssignment> not in session, add operation along 'Student.submissions' will not proceed (This warning originated from the Session 'autoflush' process, which was invoked automatically in response to a user-initiated operation.)
for notebook in submission.assignment.notebooks:
[NB_GRADER_ROOT]/nbgrader/api.py:2256: SAWarning: Object of type <SubmittedAssignment> not in session, add operation along 'Assignment.submissions' will not proceed (This warning originated from the Session 'autoflush' process, which was invoked automatically in response to a user-initiated operation.)
for notebook in submission.assignment.notebooks:
[NB_GRADER_ROOT]/nbgrader/api.py:150: SAWarning: Object of type <SubmittedNotebook> not in session, add operation along 'Notebook.submissions' will not proceed (This warning originated from the Session 'autoflush' process, which was invoked automatically in response to a user-initiated operation.)
return [x for x in self._base_cells if isinstance(x, GradeCell)]
[AutogradeApp | INFO] SubmittedAssignment<ps1 for bitdiddle> submitted at [timestamp]
[AutogradeApp | INFO] Overwriting files with master versions from the source directory
[AutogradeApp | INFO] Copying [NB_GRADER_ROOT]/nbgrader/docs/source/user_guide/source/./ps1/jupyter.png -> [NB_GRADER_ROOT]/nbgrader/docs/source/user_guide/autograded/bitdiddle/ps1/jupyter.png
[AutogradeApp | INFO] Sanitizing [NB_GRADER_ROOT]/nbgrader/docs/source/user_guide/submitted/bitdiddle/ps1/problem1.ipynb
[AutogradeApp | INFO] Converting notebook [NB_GRADER_ROOT]/nbgrader/docs/source/user_guide/submitted/bitdiddle/ps1/problem1.ipynb
[AutogradeApp | WARNING] Attribute 'checksum' for cell correct_squares has changed! (should be: 8f41dd0f9c8fd2da8e8708d73e506b3a, got: 845d4666cabb30b6c75fc534f7375bf5)
[AutogradeApp | WARNING] Attribute 'checksum' for cell squares_invalid_input has changed! (should be: 23c2b667d3b60eff3be46eb3290a6b4a, got: 123394e73f33a622ec057e2eae51a54a)
[AutogradeApp | INFO] Writing [size] bytes to [NB_GRADER_ROOT]/nbgrader/docs/source/user_guide/autograded/bitdiddle/ps1/problem1.ipynb
[AutogradeApp | INFO] Autograding [NB_GRADER_ROOT]/nbgrader/docs/source/user_guide/autograded/bitdiddle/ps1/problem1.ipynb
[AutogradeApp | INFO] Converting notebook [NB_GRADER_ROOT]/nbgrader/docs/source/user_guide/autograded/bitdiddle/ps1/problem1.ipynb
0.00s - Debugger warning: It seems that frozen modules are being used, which may
0.00s - make the debugger miss breakpoints. Please pass -Xfrozen_modules=off
0.00s - to python to disable frozen modules.
0.00s - Note: Debugging will proceed. Set PYDEVD_DISABLE_FILE_VALIDATION=1 to disable this validation.
[AutogradeApp | INFO] Writing [size] bytes to [NB_GRADER_ROOT]/nbgrader/docs/source/user_guide/autograded/bitdiddle/ps1/problem1.ipynb
[AutogradeApp | INFO] Sanitizing [NB_GRADER_ROOT]/nbgrader/docs/source/user_guide/submitted/bitdiddle/ps1/problem2.ipynb
[AutogradeApp | INFO] Converting notebook [NB_GRADER_ROOT]/nbgrader/docs/source/user_guide/submitted/bitdiddle/ps1/problem2.ipynb
[AutogradeApp | INFO] Writing [size] bytes to [NB_GRADER_ROOT]/nbgrader/docs/source/user_guide/autograded/bitdiddle/ps1/problem2.ipynb
[AutogradeApp | INFO] Autograding [NB_GRADER_ROOT]/nbgrader/docs/source/user_guide/autograded/bitdiddle/ps1/problem2.ipynb
[AutogradeApp | INFO] Converting notebook [NB_GRADER_ROOT]/nbgrader/docs/source/user_guide/autograded/bitdiddle/ps1/problem2.ipynb
0.00s - Debugger warning: It seems that frozen modules are being used, which may
0.00s - make the debugger miss breakpoints. Please pass -Xfrozen_modules=off
0.00s - to python to disable frozen modules.
0.00s - Note: Debugging will proceed. Set PYDEVD_DISABLE_FILE_VALIDATION=1 to disable this validation.
[AutogradeApp | INFO] Writing [size] bytes to [NB_GRADER_ROOT]/nbgrader/docs/source/user_guide/autograded/bitdiddle/ps1/problem2.ipynb
[AutogradeApp | INFO] Setting destination file permissions to 444
[AutogradeApp | INFO] Copying [NB_GRADER_ROOT]/nbgrader/docs/source/user_guide/submitted/hacker/ps1/timestamp.txt -> [NB_GRADER_ROOT]/nbgrader/docs/source/user_guide/autograded/hacker/ps1/timestamp.txt
[AutogradeApp | INFO] Copying [NB_GRADER_ROOT]/nbgrader/docs/source/user_guide/submitted/hacker/ps1/jupyter.png -> [NB_GRADER_ROOT]/nbgrader/docs/source/user_guide/autograded/hacker/ps1/jupyter.png
[AutogradeApp | INFO] Creating/updating student with ID 'hacker': {}
[NB_GRADER_ROOT]/nbgrader/api.py:2256: SAWarning: Object of type <SubmittedAssignment> not in session, add operation along 'Student.submissions' will not proceed (This warning originated from the Session 'autoflush' process, which was invoked automatically in response to a user-initiated operation.)
for notebook in submission.assignment.notebooks:
[NB_GRADER_ROOT]/nbgrader/api.py:2256: SAWarning: Object of type <SubmittedAssignment> not in session, add operation along 'Assignment.submissions' will not proceed (This warning originated from the Session 'autoflush' process, which was invoked automatically in response to a user-initiated operation.)
for notebook in submission.assignment.notebooks:
[NB_GRADER_ROOT]/nbgrader/api.py:150: SAWarning: Object of type <SubmittedNotebook> not in session, add operation along 'Notebook.submissions' will not proceed (This warning originated from the Session 'autoflush' process, which was invoked automatically in response to a user-initiated operation.)
return [x for x in self._base_cells if isinstance(x, GradeCell)]
[AutogradeApp | INFO] SubmittedAssignment<ps1 for hacker> submitted at [timestamp]
[AutogradeApp | INFO] Overwriting files with master versions from the source directory
[AutogradeApp | INFO] Copying [NB_GRADER_ROOT]/nbgrader/docs/source/user_guide/source/./ps1/jupyter.png -> [NB_GRADER_ROOT]/nbgrader/docs/source/user_guide/autograded/hacker/ps1/jupyter.png
[AutogradeApp | INFO] Sanitizing [NB_GRADER_ROOT]/nbgrader/docs/source/user_guide/submitted/hacker/ps1/problem1.ipynb
[AutogradeApp | INFO] Converting notebook [NB_GRADER_ROOT]/nbgrader/docs/source/user_guide/submitted/hacker/ps1/problem1.ipynb
[AutogradeApp | INFO] Writing [size] bytes to [NB_GRADER_ROOT]/nbgrader/docs/source/user_guide/autograded/hacker/ps1/problem1.ipynb
[AutogradeApp | INFO] Autograding [NB_GRADER_ROOT]/nbgrader/docs/source/user_guide/autograded/hacker/ps1/problem1.ipynb
[AutogradeApp | INFO] Converting notebook [NB_GRADER_ROOT]/nbgrader/docs/source/user_guide/autograded/hacker/ps1/problem1.ipynb
0.00s - Debugger warning: It seems that frozen modules are being used, which may
0.00s - make the debugger miss breakpoints. Please pass -Xfrozen_modules=off
0.00s - to python to disable frozen modules.
0.00s - Note: Debugging will proceed. Set PYDEVD_DISABLE_FILE_VALIDATION=1 to disable this validation.
[AutogradeApp | INFO] Writing [size] bytes to [NB_GRADER_ROOT]/nbgrader/docs/source/user_guide/autograded/hacker/ps1/problem1.ipynb
[AutogradeApp | INFO] Sanitizing [NB_GRADER_ROOT]/nbgrader/docs/source/user_guide/submitted/hacker/ps1/problem2.ipynb
[AutogradeApp | INFO] Converting notebook [NB_GRADER_ROOT]/nbgrader/docs/source/user_guide/submitted/hacker/ps1/problem2.ipynb
[AutogradeApp | INFO] Writing [size] bytes to [NB_GRADER_ROOT]/nbgrader/docs/source/user_guide/autograded/hacker/ps1/problem2.ipynb
[AutogradeApp | INFO] Autograding [NB_GRADER_ROOT]/nbgrader/docs/source/user_guide/autograded/hacker/ps1/problem2.ipynb
[AutogradeApp | INFO] Converting notebook [NB_GRADER_ROOT]/nbgrader/docs/source/user_guide/autograded/hacker/ps1/problem2.ipynb
0.00s - Debugger warning: It seems that frozen modules are being used, which may
0.00s - make the debugger miss breakpoints. Please pass -Xfrozen_modules=off
0.00s - to python to disable frozen modules.
0.00s - Note: Debugging will proceed. Set PYDEVD_DISABLE_FILE_VALIDATION=1 to disable this validation.
[AutogradeApp | INFO] Writing [size] bytes to [NB_GRADER_ROOT]/nbgrader/docs/source/user_guide/autograded/hacker/ps1/problem2.ipynb
[AutogradeApp | INFO] Setting destination file permissions to 444
When grading the submission for Bitdiddle, you’ll see some warnings
that look like “Checksum for grade cell correct_squares has changed!”.
What’s happening here is that nbgrader has recorded what the original
contents of the grade cell correct_squares (when
nbgrader generate_assignment was run), and is checking the submitted
version against this original version. It has found that the submitted
version changed (perhaps this student tried to cheat by commenting out
the failing tests), and has therefore overwritten the submitted version
of the tests with the original version of the tests.
You may also notice that there is a note saying “ps1 for Bitdiddle is
21503.948203 seconds late”. What is happening here is that nbgrader is
detecting a file in Bitdiddle’s submission called timestamp.txt,
reading in that timestamp, and saving it into the database. From there,
it can compare the timestamp to the duedate of the problem set, and
compute whether the submission is at all late.
Once the autograding is complete, there will be new directories for the autograded versions of the submissions:
autograded/{student_id}/{assignment_id}/{notebook_id}.ipynb
Autograded submission 1:
Autograded submission 2:
Manual grading
See also
- The philosophy and the approach
More details on how the nbgrader hierarchy is structured.
- Configuration options
Details on
nbgrader_config.py
After assignments have been autograded, they will saved into an autograded directory (see The philosophy and the approach for details):
After running nbgrader autograde, the autograded version of the
notebooks will be:
autograded/{student_id}/{assignment_id}/{notebook_id}.ipynb
We can manually grade assignments through the formgrader as well, by clicking on the “Manual Grading” navigation button. This will provide you with an interface for hand grading assignments that it finds in the directory listed above. Note that this applies to all assignments as well – as long as the autograder has been run on the assignment, it will be available for manual grading via the formgrader.
Generate feedback on assignments
See also
- nbgrader generate feedback
Command line options for
nbgrader generate_feedback- nbgrader release feedback
Command line options for
nbgrader release_feedback- The philosophy and the approach
Details about how the directory hierarchy is structured
- Configuration options
Details on
nbgrader_config.py
As mentioned before, after assignments have been autograded and/or manually graded, they will located in the autograded directory (see The philosophy and the approach for details):
autograded/{student_id}/{assignment_id}/{notebook_id}.ipynb
Creating feedback for students is divided into two parts:
generate feedback
release feedback
Generating feedback will create HTML files in the local instructor directory. Releasing feedback will copy those HTML files to the nbgrader exchange.
We can generate feedback based on the graded notebooks by running the
nbgrader generate_feedback command, which will produce HTML versions
of these notebooks at the following location:
feedback/{student_id}/{assignment_id}/{notebook_id}.html
The nbgrader generate_feedback is available by clicking the Generate
Feedback button on either the Manage Assignments view (to generate
feedback for all graded submissions), or on the individual student’s
Manage Submission page (to generate feedback for that specific
individual).
We can release the generated feedback by running the
nbgrader release_feedback command, which will send the generated
HTML files to the nbgrader exchange.
The nbgrader release_feedback is available by clicking the Release
Feedback button on either the Manage Assignments view (to release
feedback for all generated feedback), or on the individual student’s
Manage Submission page (to release feedback for that specific
individual).
Workflow example: Instructor returning feedback to students
In some scenarios, you may not want to (or be able to) use the exchange to deliver student feedback. This sections describes a workflow for manually returning generated feedback.
In the following example, we have an assignment with two notebooks. There are two submissions of the assignment that have been graded:
Autograded submission 1:
Autograded submission 2:
Generating feedback is fairly straightforward (and as with the other nbgrader commands for instructors, this must be run from the root of the course directory):
%%bash

nbgrader generate_feedback "ps1"
[GenerateFeedbackApp | WARNING] No nbgrader_config.py file found (rerun with --debug to see where nbgrader is looking)
[GenerateFeedbackApp | INFO] Copying [NB_GRADER_ROOT]/nbgrader/docs/source/user_guide/autograded/bitdiddle/ps1/timestamp.txt -> [NB_GRADER_ROOT]/nbgrader/docs/source/user_guide/feedback/bitdiddle/ps1/timestamp.txt
[GenerateFeedbackApp | INFO] Copying [NB_GRADER_ROOT]/nbgrader/docs/source/user_guide/autograded/bitdiddle/ps1/jupyter.png -> [NB_GRADER_ROOT]/nbgrader/docs/source/user_guide/feedback/bitdiddle/ps1/jupyter.png
[GenerateFeedbackApp | INFO] Converting notebook [NB_GRADER_ROOT]/nbgrader/docs/source/user_guide/autograded/bitdiddle/ps1/problem1.ipynb
[GenerateFeedbackApp | INFO] Writing [size] bytes to [NB_GRADER_ROOT]/nbgrader/docs/source/user_guide/feedback/bitdiddle/ps1/problem1.html
[GenerateFeedbackApp | INFO] Converting notebook [NB_GRADER_ROOT]/nbgrader/docs/source/user_guide/autograded/bitdiddle/ps1/problem2.ipynb
[GenerateFeedbackApp | INFO] Writing [size] bytes to [NB_GRADER_ROOT]/nbgrader/docs/source/user_guide/feedback/bitdiddle/ps1/problem2.html
[GenerateFeedbackApp | INFO] Setting destination file permissions to 644
[GenerateFeedbackApp | INFO] Copying [NB_GRADER_ROOT]/nbgrader/docs/source/user_guide/autograded/hacker/ps1/timestamp.txt -> [NB_GRADER_ROOT]/nbgrader/docs/source/user_guide/feedback/hacker/ps1/timestamp.txt
[GenerateFeedbackApp | INFO] Copying [NB_GRADER_ROOT]/nbgrader/docs/source/user_guide/autograded/hacker/ps1/jupyter.png -> [NB_GRADER_ROOT]/nbgrader/docs/source/user_guide/feedback/hacker/ps1/jupyter.png
[GenerateFeedbackApp | INFO] Converting notebook [NB_GRADER_ROOT]/nbgrader/docs/source/user_guide/autograded/hacker/ps1/problem1.ipynb
[GenerateFeedbackApp | INFO] Writing [size] bytes to [NB_GRADER_ROOT]/nbgrader/docs/source/user_guide/feedback/hacker/ps1/problem1.html
[GenerateFeedbackApp | INFO] Converting notebook [NB_GRADER_ROOT]/nbgrader/docs/source/user_guide/autograded/hacker/ps1/problem2.ipynb
[GenerateFeedbackApp | INFO] Writing [size] bytes to [NB_GRADER_ROOT]/nbgrader/docs/source/user_guide/feedback/hacker/ps1/problem2.html
[GenerateFeedbackApp | INFO] Setting destination file permissions to 644
Once the feedback has been generated, there will be new directories and HTML files corresponding to each notebook in each submission:
Feedback for submission 1:
Feedback for submission 2:
If the exchange is available, one would of course use
nbgrader release_feedback. However if not available, you can now
deliver these generated HTML feedback files via whatever mechanism you
wish.
Getting grades from the database
New in version 0.4.0.
See also
- nbgrader export
Command line options for
nbgrader export- Export plugin
Details on how to write your own custom exporter.
In addition to creating feedback for the students, you may need to
upload grades to whatever learning management system your school uses
(e.g. Canvas, Blackboard, etc.). nbgrader provides a way to export
grades to CSV out of the box, with the nbgrader export command:
%%bash

nbgrader export
[ExportApp | WARNING] No nbgrader_config.py file found (rerun with --debug to see where nbgrader is looking)
[ExportApp | INFO] Using exporter: CsvExportPlugin
[ExportApp | INFO] Exporting grades to grades.csv
After running nbgrader export, you will see the grades in a CSV file
called grades.csv:
%%bash

cat grades.csv
assignment,duedate,timestamp,student_id,last_name,first_name,email,raw_score,late_submission_penalty,score,max_score
ps1,,[timestamp],bitdiddle,,,,1.5,0.0,1.5,13.0
ps1,,[timestamp],hacker,,,,3.0,0.0,3.0,13.0
If you need to customize how the grades are exported, you can write your own exporter.
