Exchanging assignment files
Distributing assignments to students and collecting them can be a logistical nightmare. If you are running nbgrader on a server, some of this pain can be relieved by relying on nbgrader’s built-in functionality for releasing and collecting assignments on the instructor’s side, and fetching and submitting assignments on the student’s side.
This page describes the built-in implementation of an exchange directory coupled with instructor and student interfaces - both integrated in the Jupyter interface and via the command line. Since nbgrader 0.7.0, the exchange is modular, and a different implementation could be used (with the same user interface as below).
Setting up the exchange
After an assignment has been created using
nbgrader generate_assignment, the instructor must actually release
that assignment to students. If the class is being taught on a single
filesystem, then the instructor may use nbgrader release_assignment
to copy the assignment files to a shared location on the filesystem for
students to then download.
First, we must specify a few configuration options. To do this, we’ll
create a nbgrader_config.py file that will get automatically loaded
when we run nbgrader:
%%file nbgrader_config.py

c = get_config()

c.CourseDirectory.course_id = "example_course"
c.Exchange.root = "/tmp/exchange"
Writing nbgrader_config.py
In the config file, we’ve specified the “exchange” directory to be
/tmp/exchange. This directory must exist before running
nbgrader, and it must be readable and writable by all users, so
we’ll first create it and configure the appropriate permissions:
%%bash

# remove existing directory, so we can start fresh for demo purposes
rm -rf /tmp/exchange

# create the exchange directory, with write permissions for everyone
mkdir /tmp/exchange
chmod ugo+rw /tmp/exchange
Releasing assignments
See also
- Creating and grading assignments
Details on generating assignments
- nbgrader release assignment
Command line options for
nbgrader release_assignment- nbgrader list
Command line options for
nbgrader list- The philosophy and the approach
More details on how the nbgrader hierarchy is structured.
- Configuration options
Details on
nbgrader_config.py
From the formgrader
Using the formgrader extension, you may release assignments by clicking on the “release” button:
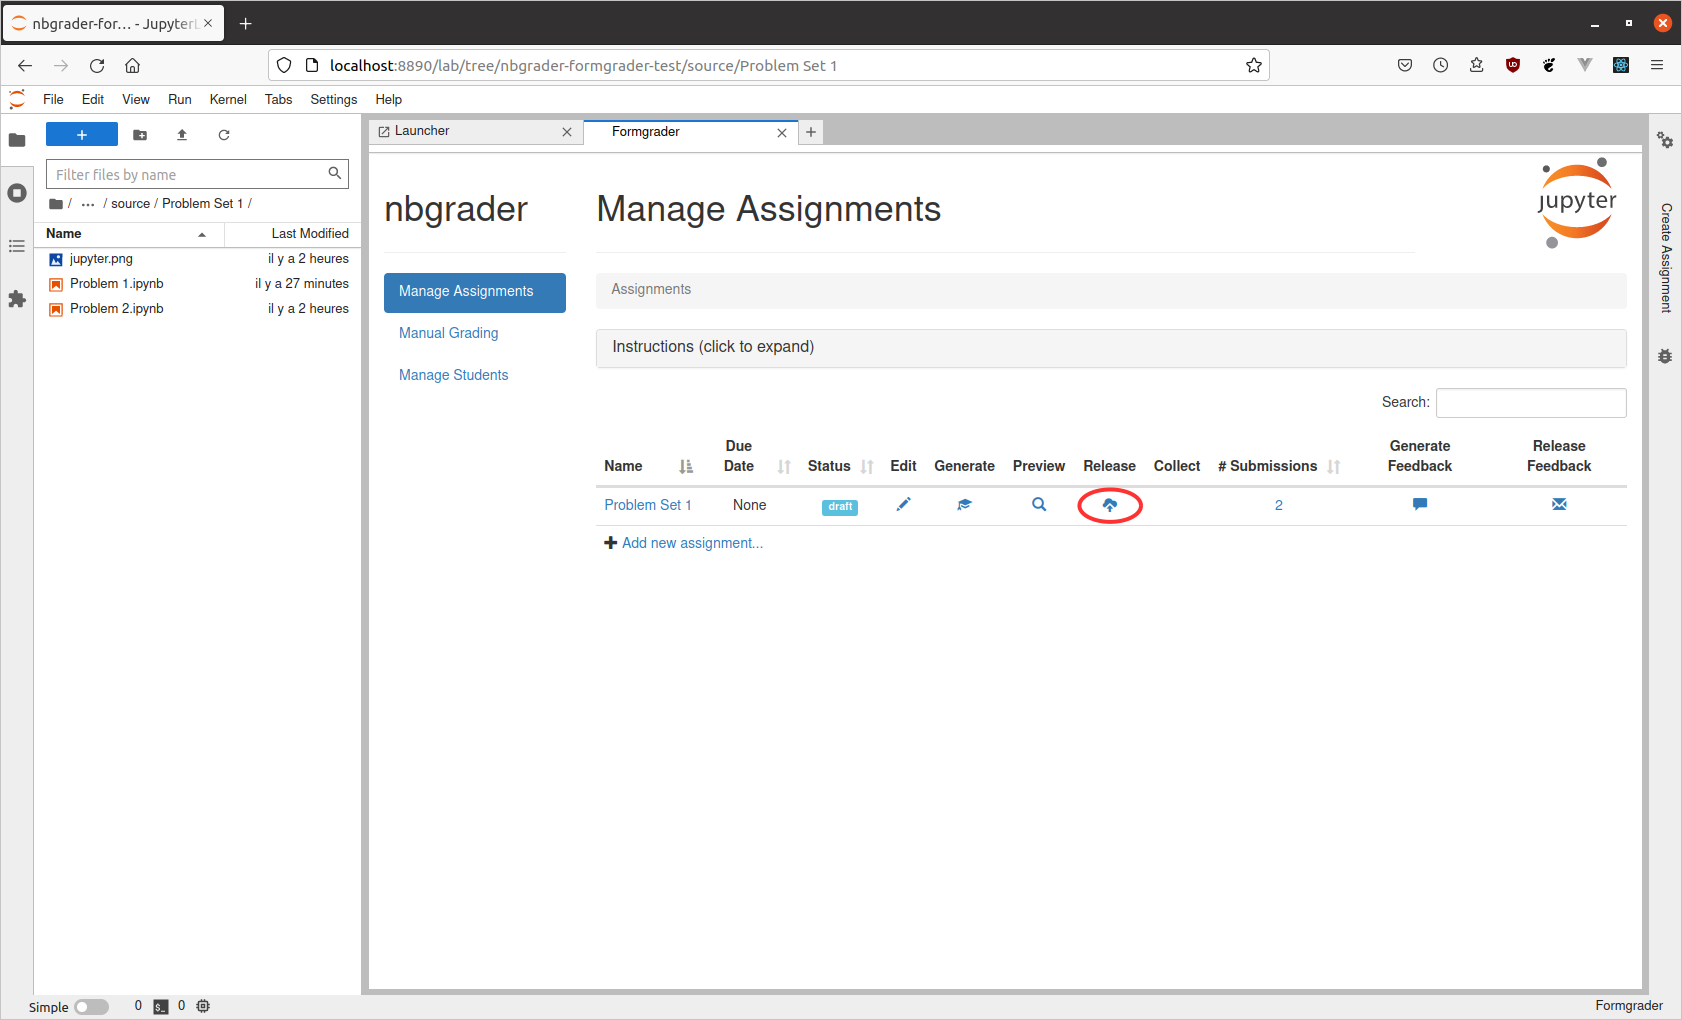
manage assignments release
Note that for the “release” button to become available, the
course_id option must be set in nbgrader_config.py. Once
completed, you will see a pop-up window with log output:
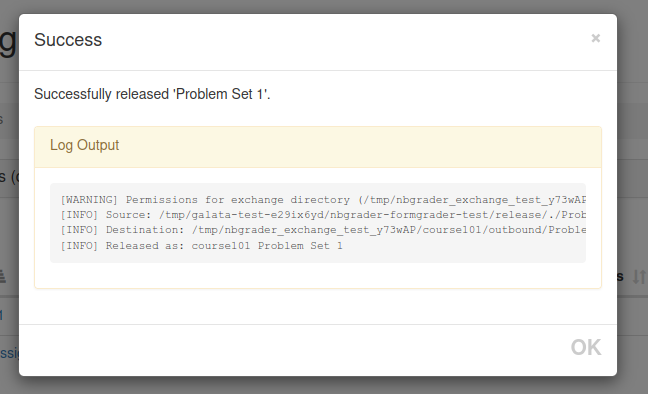
release assignment
If you decide you want to “un-release” an assignment, you may do so by clicking again on the “release” button (which is now an “x”). However, note that students who have already downloaded the assignment will still have access to their downloaded copy. Unreleasing an assignment only prevents more students from downloading it.
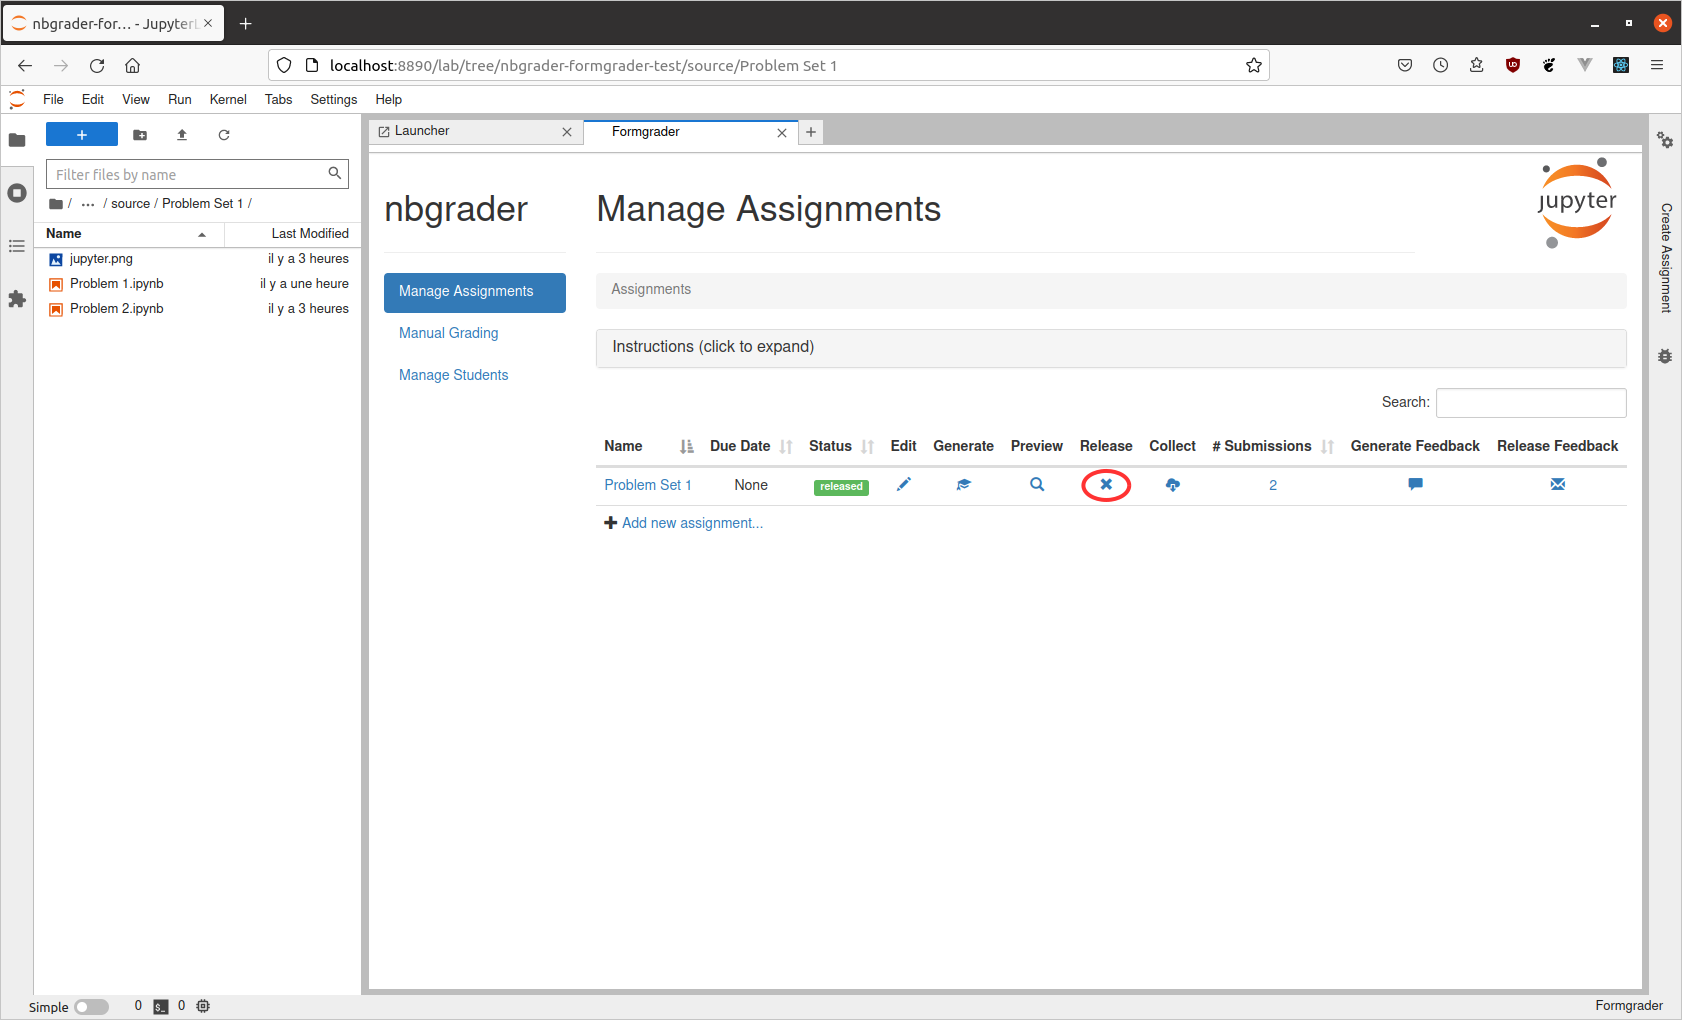
manage assignments un-release
From the command line
Now that we have the directory created, we can actually run
nbgrader release_assignment (and as with the other nbgrader commands
for instructors, this must be run from the root of the course
directory):
%%bash

nbgrader release_assignment "ps1"
[ReleaseAssignmentApp | INFO] Source: [NB_GRADER_ROOT]/nbgrader/docs/source/user_guide/release/./ps1
[ReleaseAssignmentApp | INFO] Destination: /tmp/exchange/example_course/outbound/ps1
[ReleaseAssignmentApp | INFO] Released as: example_course ps1
Finally, you can verify that the assignment has been appropriately
released by running the nbgrader list command:
%%bash

nbgrader list
[ListApp | INFO] Released assignments:
[ListApp | INFO] example_course ps1
Note that there should only ever be one instructor who runs the
nbgrader release_assignment and nbgrader collect commands (and
there should probably only be one instructor – the same instructor – who
runs nbgrader generate_assignment, nbgrader autograde and the
formgrader as well). However this does not mean that only one instructor
can do the grading, it just means that only one instructor manages the
assignment files. Other instructors can still perform grading by
accessing the notebook where the formgrader is running.
Fetching assignments
See also
- nbgrader fetch assignment
Command line options for
nbgrader fetch_assignment- nbgrader list
Command line options for
nbgrader list- Configuration options
Details on
nbgrader_config.py
From the student’s perspective, they can list what assignments have been released, and then fetch a copy of the assignment to work on. First, we’ll create a temporary directory to represent the student’s home directory:
%%bash

# remove the fake student home directory if it exists, for demo purposes
rm -rf /tmp/student_home

# create the fake student home directory and switch to it
mkdir /tmp/student_home
If you are not using the default exchange directory (as is the case here), you will additionally need to provide your students with a configuration file that sets the appropriate directory for them:
%%file /tmp/student_home/nbgrader_config.py

c = get_config()
c.Exchange.root = '/tmp/exchange'
c.CourseDirectory.course_id = "example_course"
Writing /tmp/student_home/nbgrader_config.py
From the notebook dashboard
Warning
The “Assignment List” extension is not fully compatible with multiple courses on the same server. Please see Can I use the “Assignment List” extension with multiple classes? for details.
Alternatively, students can fetch assignments using the assignment list notebook server extension. You must have installed the extension by following the instructions here.
After which you can open “Assignments” tab from Jupyter Lab command
palette (Command/Ctrl + Shift + c) and typing “Assignment List”:
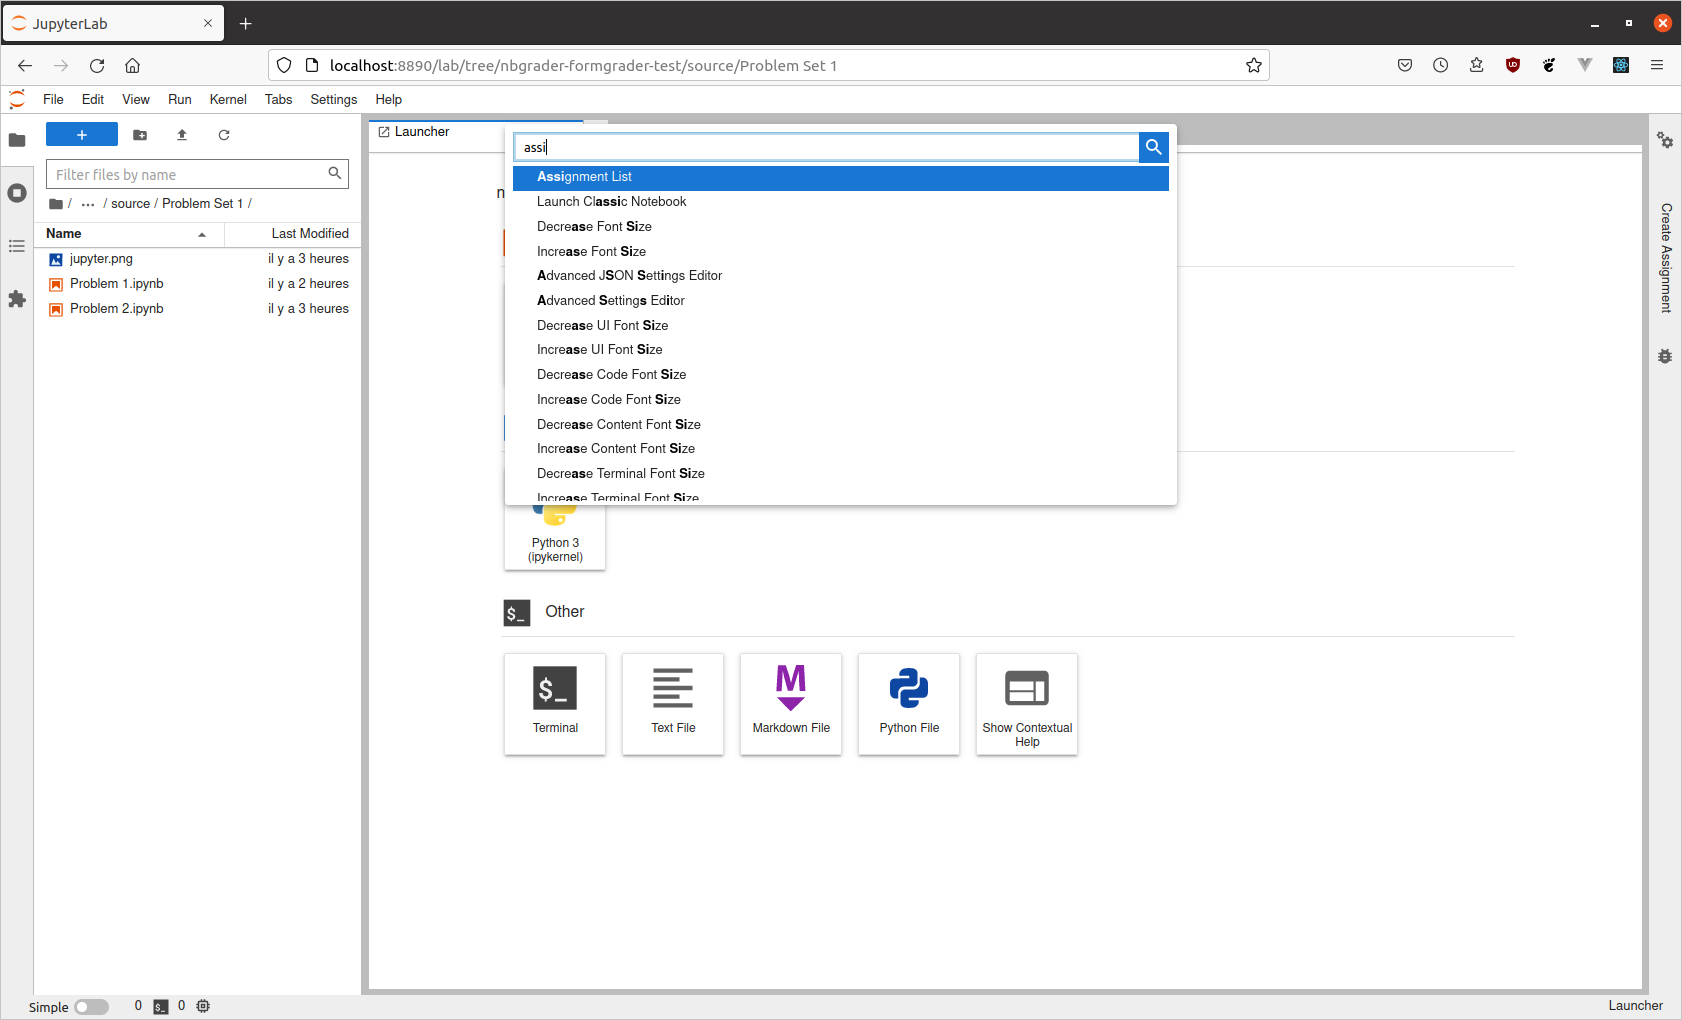
assignment list command palette
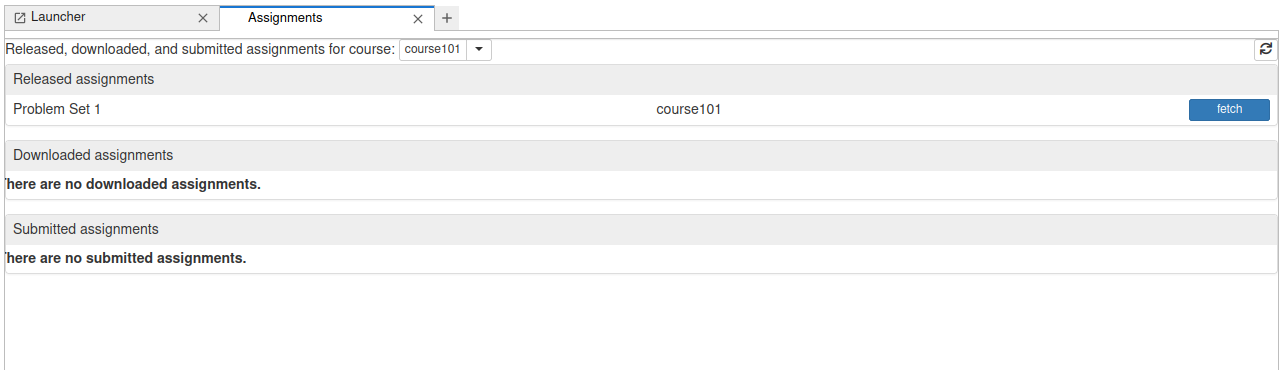
assignment list released
The image above shows that there has been one assignment released
(“Problem Set 1”) for the class “example_course”. To get this
assignment, students can click the “Fetch” button (analogous to running
nbgrader fetch_assignment 'Problem Set 1' --course example_course.
Note: this assumes nbgrader is always run from the root of the
notebook server, which on JupyterHub is most likely the root of the
user’s home directory.
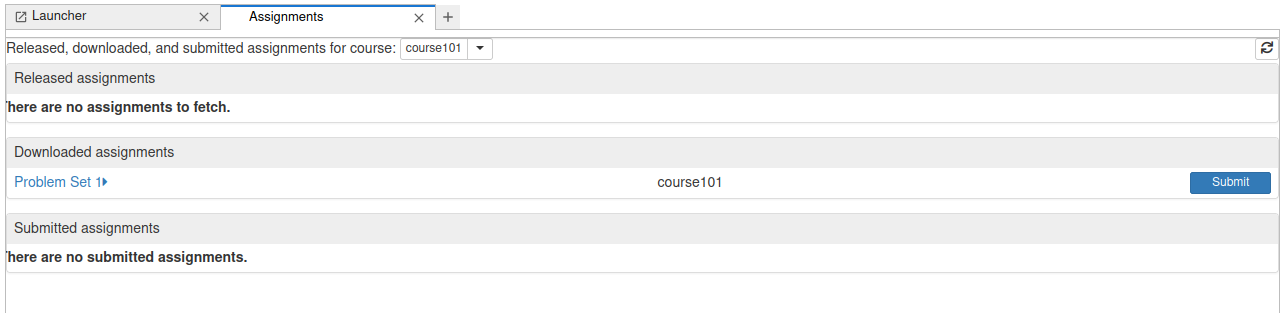
After the assignment is fetched, it will appear in the list of “Downloaded assignments”:
assignment list downloaded
Students can click on the name of the assignment to expand it and see all the notebooks in the assignment:
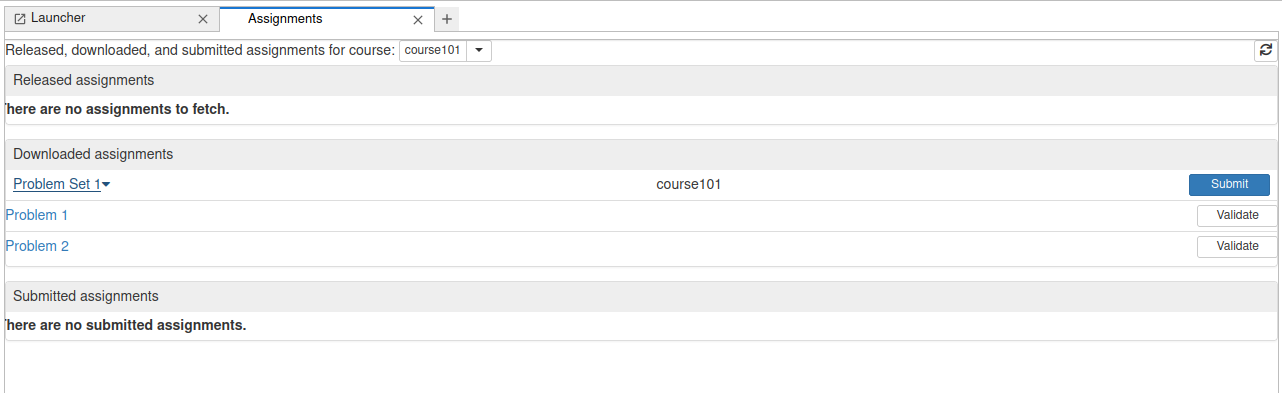
assignment list downloaded expanded
Clicking on a particular notebook will open it in a new tab in Jupyter Lab.
From the command line
From the student’s perspective, they can see what assignments have been
released using nbgrader list, and passing the name of the class:
%%bash
export HOME=/tmp/student_home && cd $HOME

nbgrader list
[ListApp | INFO] Released assignments:
[ListApp | INFO] example_course ps1
They can then fetch an assignment for that class using
nbgrader fetch_assignment and passing the name of the class and the
name of the assignment:
%%bash
export HOME=/tmp/student_home && cd $HOME

nbgrader fetch_assignment "ps1"
[FetchAssignmentApp | INFO] Source: /tmp/exchange/example_course/outbound/ps1
[FetchAssignmentApp | INFO] Destination: /tmp/student_home/ps1
[FetchAssignmentApp | INFO] Fetched as: example_course ps1
Note that running nbgrader fetch_assignment copies the assignment
files from the exchange directory to the local directory, and therefore
can be used from any directory:
%%bash

ls -l "/tmp/student_home/ps1"
total ##
-rw-r--r-- 1 nb_user nb_group [size] [date] [time] jupyter.png
-rw-r--r-- 1 nb_user nb_group [size] [date] [time] problem1.ipynb
-rw-r--r-- 1 nb_user nb_group [size] [date] [time] problem1_autotest.ipynb
-rw-r--r-- 1 nb_user nb_group [size] [date] [time] problem2.ipynb
Additionally, the nbgrader fetch_assignment (as well as
nbgrader submit) command also does not rely on having access to the
nbgrader database – the database is only used by instructors.
Submitting assignments
See also
- nbgrader submit
Command line options for
nbgrader submit- nbgrader list
Command line options for
nbgrader list- Configuration options
Details on
nbgrader_config.py
From the Jupyter Lab dashboard
Warning
The “Assignment List” extension is not fully compatible with multiple courses on the same server. Please see Can I use the “Assignment List” extension with multiple classes? for details.
Alternatively, students can submit assignments using the assignment list notebook server extension. You must have installed the extension by following the instructions here. Students must have also downloaded the assignments (see Fetching assignments).
After students have worked on the assignment for a while, but before
submitting, they can validate that their notebooks pass the tests by
clicking the “Validate” button (analogous to running
nbgrader validate). If any tests fail, they will see a warning:
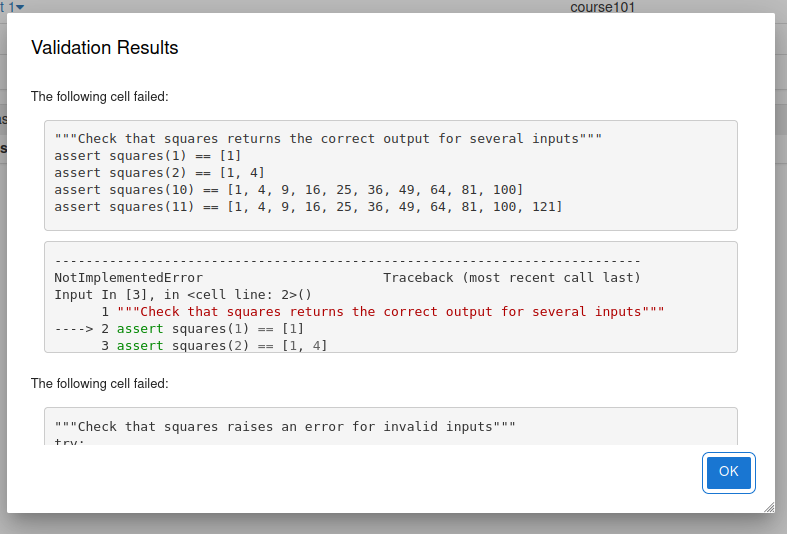
assignment list validate failed
If there are no errors, they will see that the validation passes:
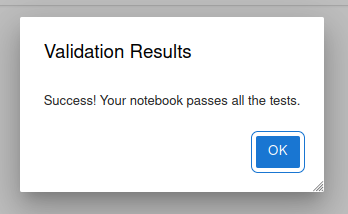
assignment list validate succeeded
Note
If the notebook has been released with hidden tests removed from the source version (see “Autograder tests” cells with hidden tests) then this validation is only done against the tests the students can see in the release version.
Once students have validated all the notebooks, they can click the
“Submit” button to submit the assignment (analogous to running
nbgrader submit ps1 --course example_course). Afterwards, it will
show up in the list of submitted assignments (and also still in the list
of downloaded assignments):
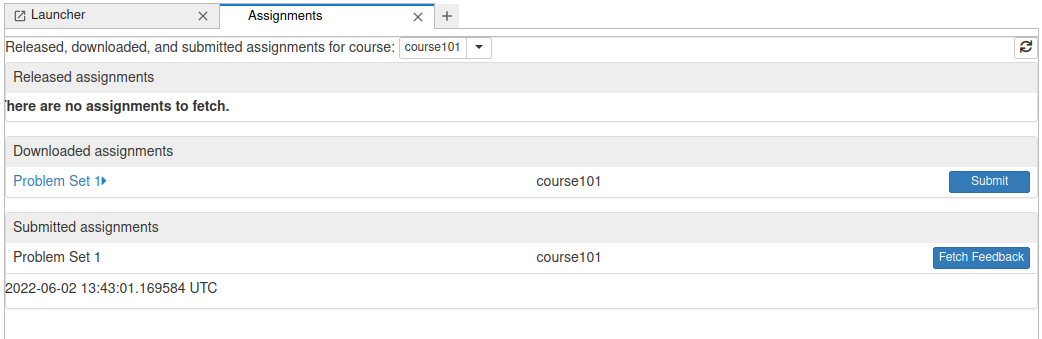
assignment list submitted
Students may submit an assignment as many times as they’d like. All copies of a submission will show up in the submitted assignments list, and when the instructor collects the assignments, they will get the most recent version of the assignment:
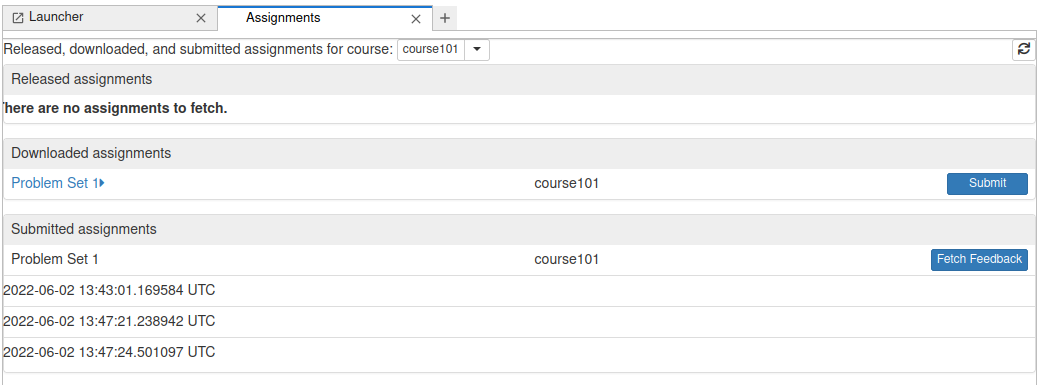
assignment list submitted again
Similarly, if the strict option (in the student’s
nbgrader_config.py file) is set to True, the students will not
be able to submit an assignment with missing notebooks (for a given
assignment):
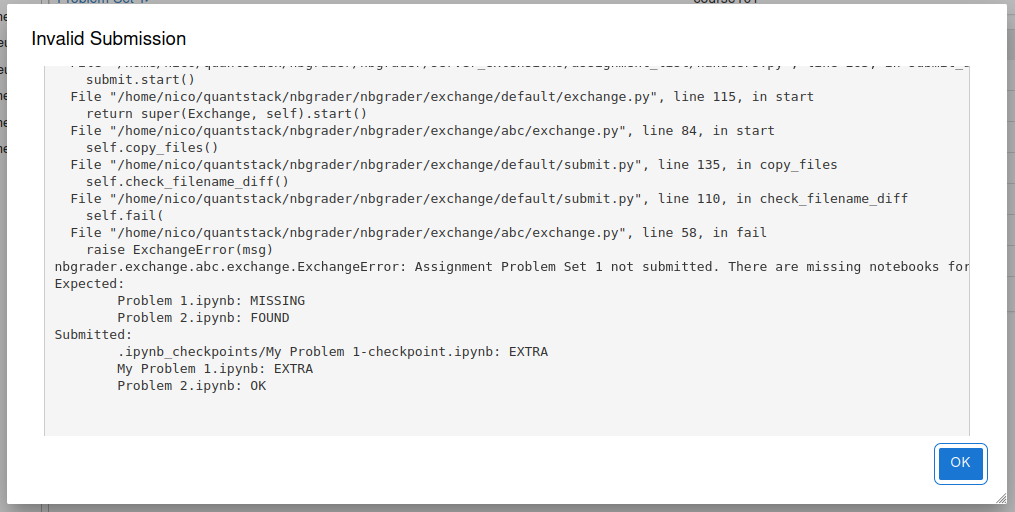
assignment list submit error
From the command line
First, as a reminder, here is what the student’s nbgrader_config.py
file looks like:
%%bash

cat /tmp/student_home/nbgrader_config.py
c = get_config()
c.Exchange.root = '/tmp/exchange'
c.CourseDirectory.course_id = "example_course"
After working on an assignment, the student can submit their version for
grading using nbgrader submit and passing the name of the assignment
and the name of the class:
%%bash
export HOME=/tmp/student_home && cd $HOME

nbgrader submit "ps1"
[SubmitApp | INFO] Source: /tmp/student_home/ps1
[SubmitApp | INFO] Destination: /tmp/exchange/example_course/inbound/nb_user+ps1+[timestamp] UTC+[random string]
[SubmitApp | INFO] Submitted as: example_course ps1 [timestamp] UTC
Note that “the name of the assignment” really corresponds to “the name of a folder”. It just happens that, in our current directory, there is a folder called “ps1”:
%%bash
export HOME=/tmp/student_home && cd $HOME

ls -l "/tmp/student_home"
total ##
-rw-rw-r-- 1 nb_user nb_group [size] [date] [time] nbgrader_config.py
drwxr-xr-x 1 nb_user nb_group [size] [date] [time] ps1
Students can see what assignments they have submitted using
nbgrader list --inbound:
%%bash
export HOME=/tmp/student_home && cd $HOME

nbgrader list --inbound
[ListApp | INFO] Submitted assignments:
[ListApp | INFO] example_course nb_user ps1 [timestamp] UTC (no feedback available)
Importantly, students can run nbgrader submit as many times as they
want, and all submitted copies of the assignment will be preserved:
%%bash
export HOME=/tmp/student_home && cd $HOME

nbgrader submit "ps1"
[SubmitApp | INFO] Source: /tmp/student_home/ps1
[SubmitApp | INFO] Destination: /tmp/exchange/example_course/inbound/nb_user+ps1+[timestamp] UTC+[random string]
[SubmitApp | INFO] Submitted as: example_course ps1 [timestamp] UTC
We can see all versions that have been submitted by again running
nbgrader list --inbound:
%%bash
export HOME=/tmp/student_home && cd $HOME

nbgrader list --inbound
[ListApp | INFO] Submitted assignments:
[ListApp | INFO] example_course nb_user ps1 [timestamp] UTC (no feedback available)
[ListApp | INFO] example_course nb_user ps1 [timestamp] UTC (no feedback available)
Note that the nbgrader submit (as well as
nbgrader fetch_assignment) command also does not rely on having
access to the nbgrader database – the database is only used by
instructors.
nbgrader requires that the submitted notebook names match the
released notebook names for each assignment. For example if a student
were to rename one of the given assignment notebooks:
%%bash
export HOME=/tmp/student_home && cd $HOME

# assume the student renamed the assignment file
mv ps1/problem1.ipynb ps1/myproblem1.ipynb

nbgrader submit "ps1"
[SubmitApp | INFO] Source: /tmp/student_home/ps1
[SubmitApp | INFO] Destination: /tmp/exchange/example_course/inbound/nb_user+ps1+[timestamp] UTC+[random string]
[SubmitApp | WARNING] Possible missing notebooks and/or extra notebooks submitted for assignment ps1:
    Expected:
            problem1.ipynb: MISSING
            problem1_autotest.ipynb: FOUND
            problem2.ipynb: FOUND
    Submitted:
            myproblem1.ipynb: EXTRA
            problem1_autotest.ipynb: OK
            problem2.ipynb: OK
[SubmitApp | INFO] Submitted as: example_course ps1 [timestamp] UTC
By default this assignment will still be submitted however only the
“FOUND” notebooks (for the given assignment) can be autograded and
will appear on the formgrade extension. “EXTRA” notebooks will not
be autograded and will not appear on the formgrade extension.
To ensure that students cannot submit an assignment with missing
notebooks (for a given assignment) the strict option, in the
student’s nbgrader_config.py file, can be set to True:
%%file /tmp/student_home/nbgrader_config.py

c = get_config()
c.Exchange.root = '/tmp/exchange'
c.CourseDirectory.course_id = "example_course"
c.ExchangeSubmit.strict = True
Overwriting /tmp/student_home/nbgrader_config.py
%%bash
export HOME=/tmp/student_home && cd $HOME

nbgrader submit "ps1" || true
[SubmitApp | INFO] Source: /tmp/student_home/ps1
[SubmitApp | INFO] Destination: /tmp/exchange/example_course/inbound/nb_user+ps1+[timestamp] UTC+[random string]
[SubmitApp | CRITICAL] Assignment ps1 not submitted. There are missing notebooks for the submission:
    Expected:
            problem1.ipynb: MISSING
            problem1_autotest.ipynb: FOUND
            problem2.ipynb: FOUND
    Submitted:
            myproblem1.ipynb: EXTRA
            problem1_autotest.ipynb: OK
            problem2.ipynb: OK
[SubmitApp | ERROR] nbgrader submit failed
Collecting assignments
See also
- Creating and grading assignments
Details on grading assignments after they have been collected
- nbgrader collect
Command line options for
nbgrader collect- nbgrader list
Command line options for
nbgrader list- The philosophy and the approach
More details on how the nbgrader hierarchy is structured.
- Configuration options
Details on
nbgrader_config.py
First, as a reminder, here is what the instructor’s
nbgrader_config.py file looks like:
%%bash

cat nbgrader_config.py
c = get_config()

c.CourseDirectory.course_id = "example_course"
c.Exchange.root = "/tmp/exchange"
From the formgrader
From the formgrader extension, we can collect submissions by clicking on the “collect” button:
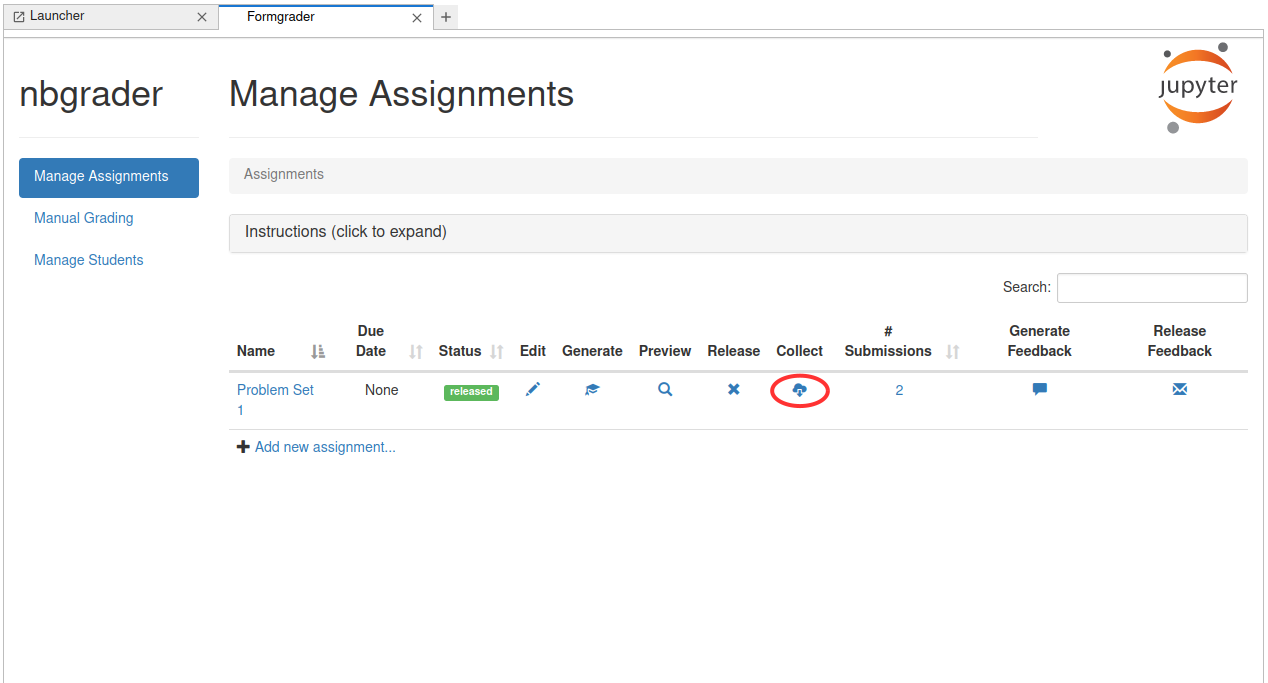
manage assignments collect
As with releasing, this will display a pop-up window when the operation is complete, telling you how many submissions were collected:

collect assignment
From here, you can click on the number of submissions to grade the collected submissions:
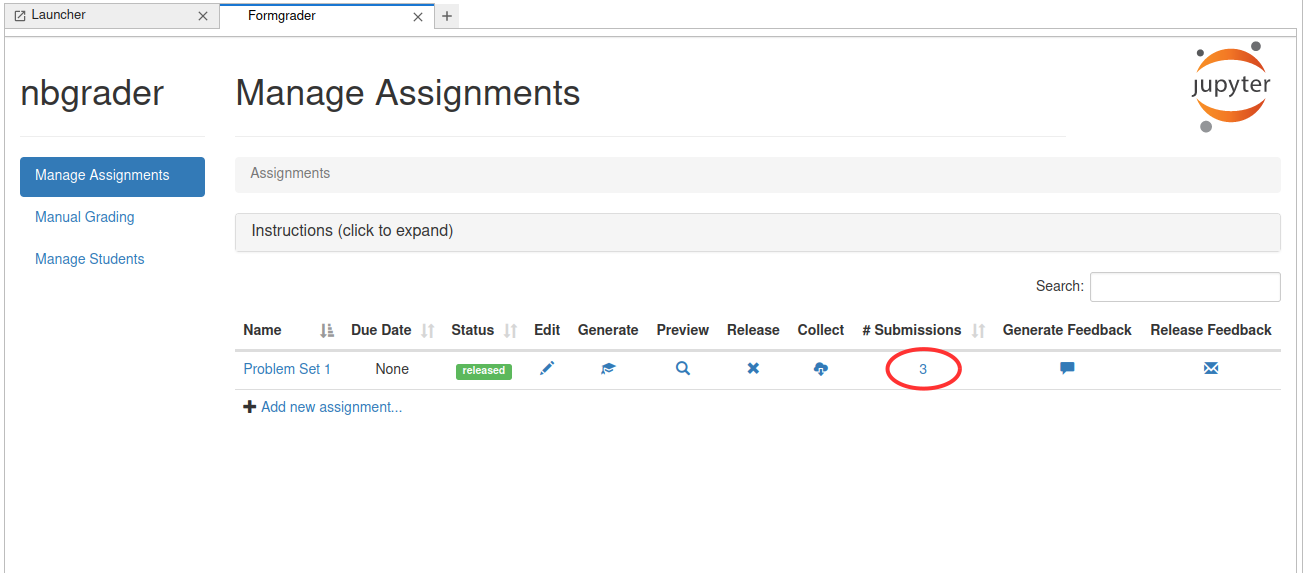
manage assignments grade collected
From the command line
After students have submitted their assignments, the instructor can view
what has been submitted with nbgrader list --inbound:
%%bash

nbgrader list --inbound
[ListApp | INFO] Submitted assignments:
[ListApp | INFO] example_course nb_user ps1 [timestamp] UTC (no feedback available)
[ListApp | INFO] example_course nb_user ps1 [timestamp] UTC (no feedback available)
[ListApp | INFO] example_course nb_user ps1 [timestamp] UTC (no feedback available)
The instructor can then collect all submitted assignments with
nbgrader collect and passing the name of the assignment (and as with
the other nbgrader commands for instructors, this must be run from the
root of the course directory):
%%bash

nbgrader collect "ps1"
[CollectApp | INFO] Processing 1 submissions of 'ps1' for course 'example_course'
[CollectApp | INFO] Collecting submission: nb_user ps1
This will copy the student submissions to the submitted folder in a
way that is automatically compatible with nbgrader autograde:
%%bash

ls -l submitted
total ##
drwxrwxr-x 1 nb_user nb_group [size] [date] [time] bitdiddle
drwxrwxr-x 1 nb_user nb_group [size] [date] [time] nb_user
drwxrwxr-x 1 nb_user nb_group [size] [date] [time] hacker
Note that there should only ever be one instructor who runs the
nbgrader release_assignment and nbgrader collect commands (and
there should probably only be one instructor – the same instructor – who
runs nbgrader generate_assignment, nbgrader autograde and the
formgrader as well). However this does not mean that only one instructor
can do the grading, it just means that only one instructor manages the
assignment files. Other instructors can still perform grading by
accessing the notebook server running the formgrader.